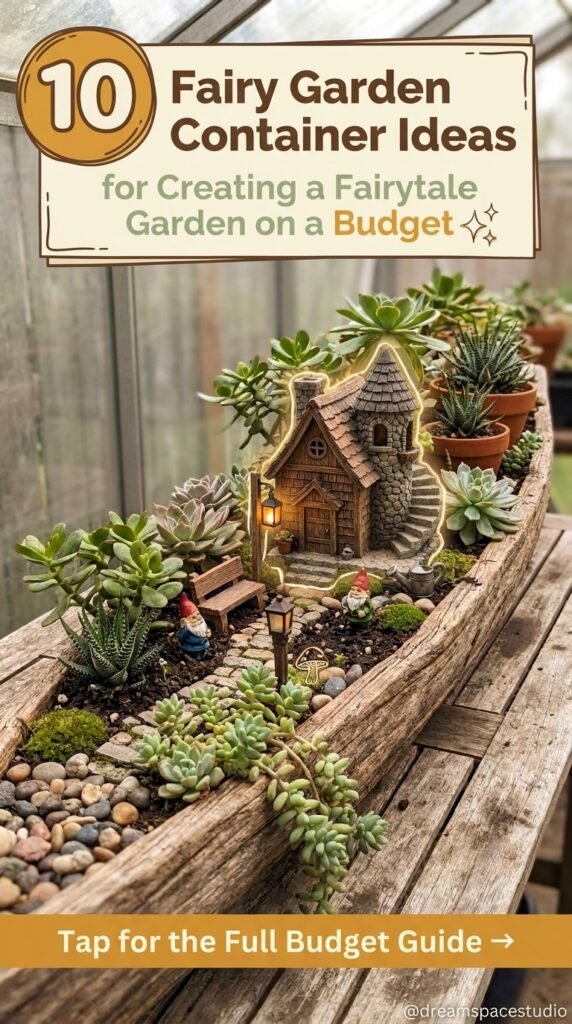
Fairy gardens look like one hobby, but the container you pick decides almost everything: what you can plant, where it can live, and how often it needs attention. A shallow dish, a hollow log, a glass globe, and a thrift-store pitcher all hold soil, and each one pushes the project in a different direction. The ten setups below are sorted by the decision they help you make, from what survives outdoors to what fits a windowsill. Compare them, pick the one that matches your space and your patience for watering, and skip the rest without guilt.
Quick Overview
| Style | Storybook miniature gardens |
|---|---|
| Best For | Patios, porches, shelves |
| Budget | Low to medium |
| Difficulty | Beginner to intermediate |
| Maintenance Level | Low to moderate |
A Hollow Log Trough Gives a Fairy Village Room to Spread Out
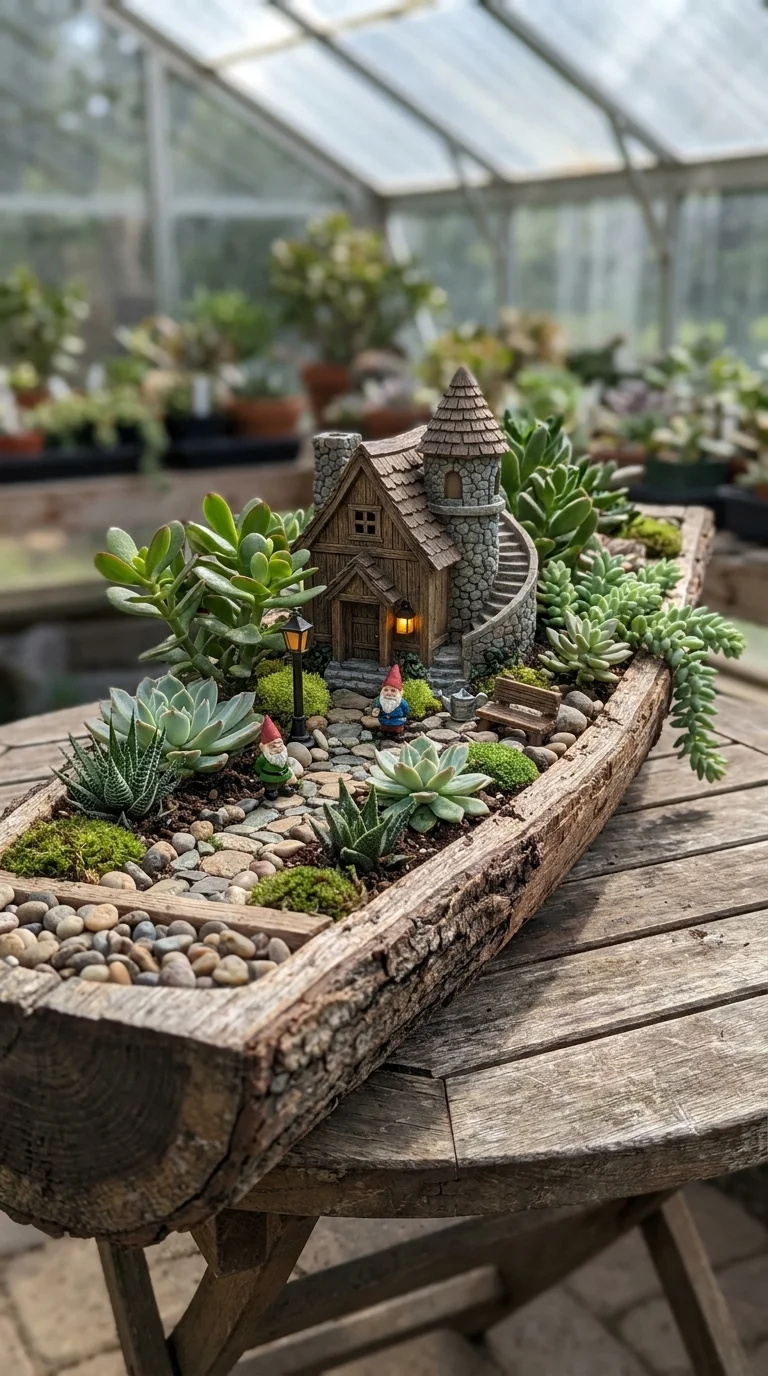
A long, weathered trough is the right container when you want a full village instead of a single vignette. The stone cottage and its round tower sit at the back, a pebble path runs forward, and the gnomes, lamppost, and tiny bench are spaced along it, so the eye travels the length of the log instead of stopping at one object. That movement is what makes it read as a place. If the storybook look appeals, our cottagecore garden ideas carry it into the rest of the yard.
It suits gardeners with a greenhouse, covered porch, or sturdy outdoor table, and people who like adjusting a scene over months. The strongest draw is room for a real layout. The trade-off is moisture: a hollowed log holds water against the wood, so add a plastic liner or drainage holes before filling it. Succulents also dislike the damp that moss prefers, so keep the moss to the shaded corners.
To recreate it, build back to front. Set the cottage first, run the path with the smallest pebbles nearest the house, then tuck rosette succulents and trailing sedum around the edges. On a smaller budget, use a wooden planter box and one resin cottage. The usual slip is crowding the path with figures, which shrinks the sense of distance. Add three accessories, live with it for a week, then decide on more.
Tiny Wire Flowers Beside Real Daffodils Let Scale Do the Work
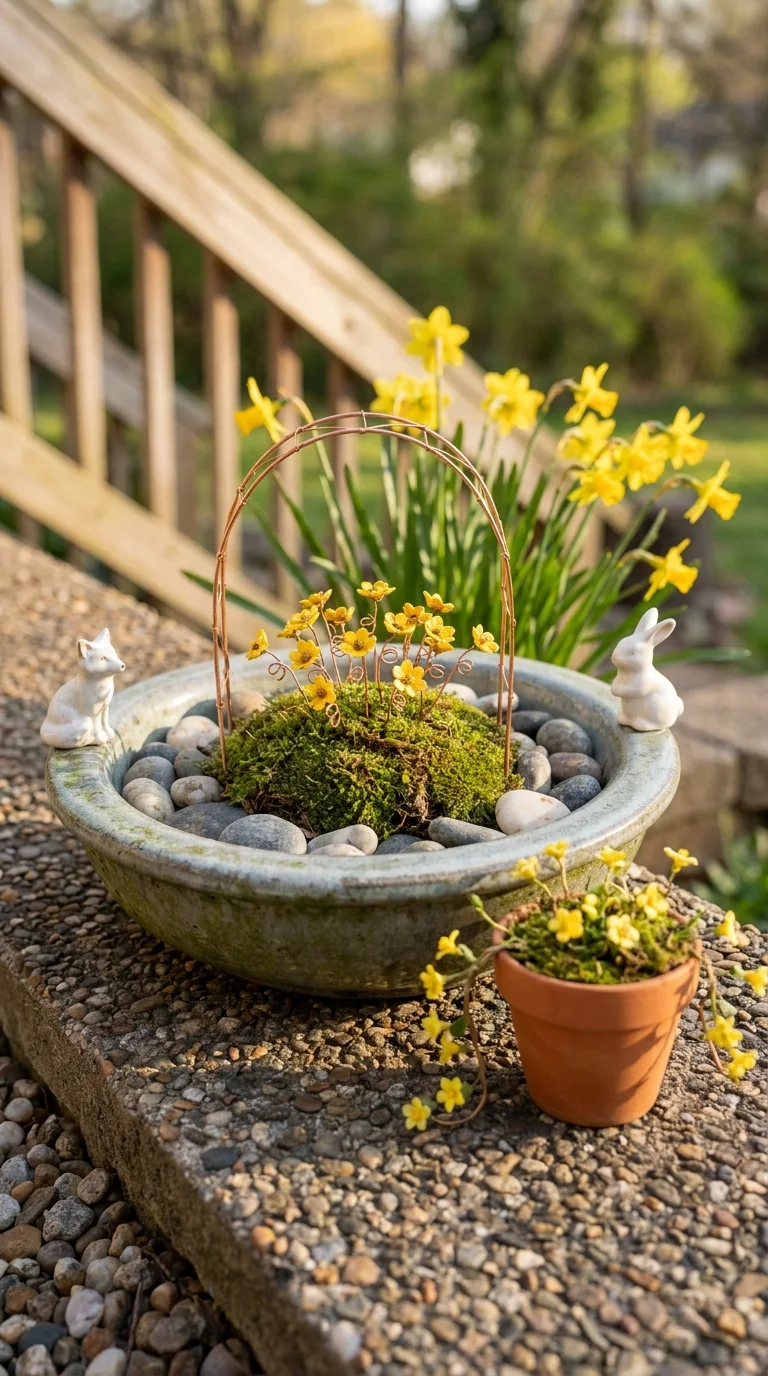
Many fairy gardens lean on tiny buildings. This one leans on contrast in scale. A copper wire arch with miniature wire blossoms sits on a moss mound inside a shallow stone bowl, while full-size daffodils rise behind it. Side by side, the wire flowers read as a secret garden and the daffodils read as trees. A small white fox and rabbit perch on the rim like guards at a gate.
It fits porch steps, entry landings, and patio edges where a bowl sits at eye level for anyone walking past, and it suits gardeners who want spring color with less watering, since the wire and ceramic won’t wilt. The compromise is the moss. It looks like live cushion moss, and live moss browns in hard afternoon sun, so give it shade or an occasional misting.
To make it, bend thin copper craft wire into an arch, then twist five or six small blossoms onto wire stems. A saucer, river pebbles, and a bag of sheet moss cover the budget version. Copper darkens and greens outdoors, so either enjoy the patina or seal it with clear lacquer. The mistake to avoid is an arch taller than the plants behind it, which flips the scale illusion. Keep it lower than the daffodils.
The Lid on This Cactus Globe Is the Detail Worth Questioning
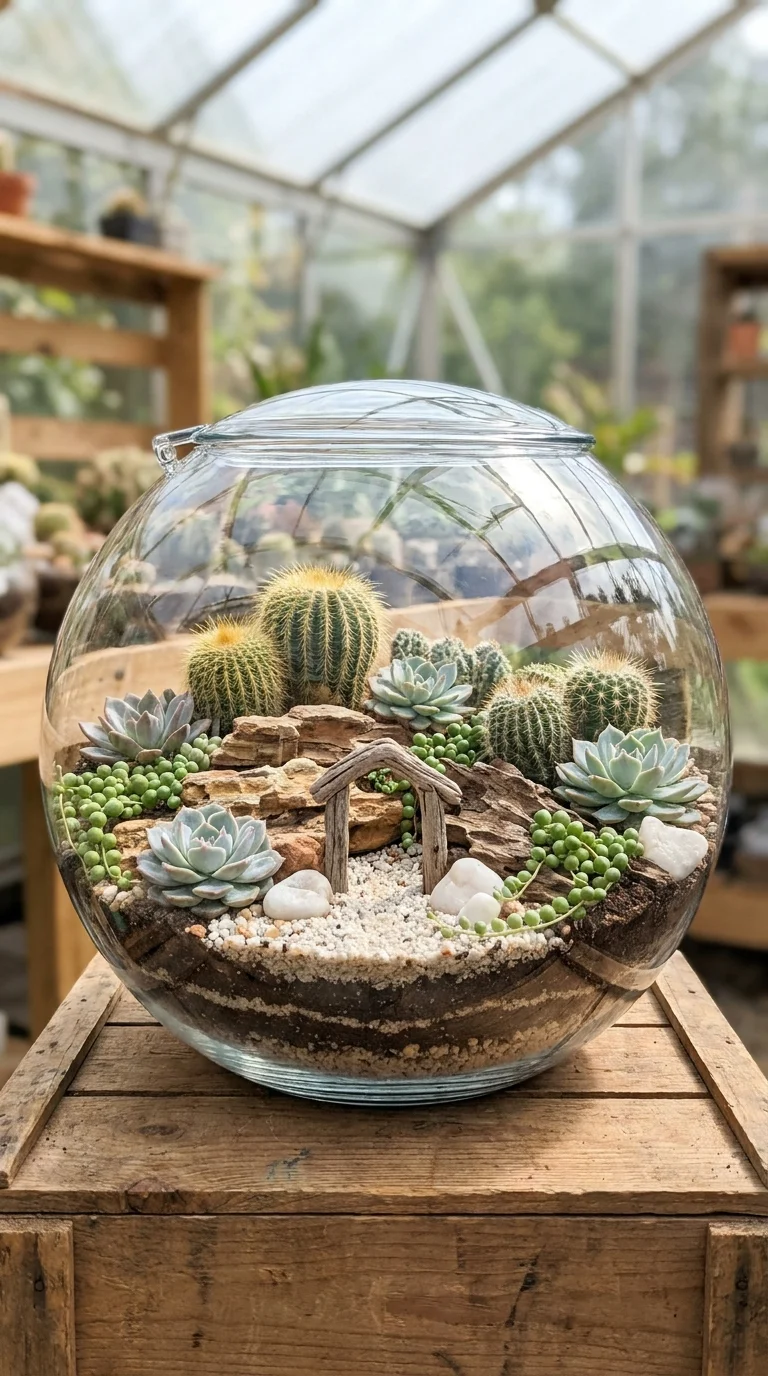
A big glass globe gives you something a pot can’t: a cross-section. You can see bands of soil and sand, golden barrel-style cacti, gray-blue echeveria, strands of string-of-pearls, and a small driftwood arch over a white gravel clearing. It suits a bright shelf, sunroom, or greenhouse bench, and people who want a desert scene to watch rather than tend.
The catch is the domed lid. Desert plants want dry, moving air, and closed glass traps humidity and heat, so leave the lid off or propped open. There’s no visible drain hole either, which makes restraint with water the whole maintenance plan.
Four Ways This Globe Goes Wrong
- Sealing the lid, which holds the moisture cacti and echeveria tend to rot in.
- Watering on a schedule instead of checking that the soil is dry all the way down.
- Adding untreated driftwood or bark that stays damp in glass and can grow mold.
- Parking the globe in strong direct sun, where glass can push soil temperatures past what the plants tolerate.
For a lower-cost version, a large glass bowl or vase can stand in, filled with cactus mix, coarse sand, and small nursery cacti (fold newspaper around the spines to handle them). Plant it, skip the lid, and water with a spoon once the soil is dry.
Four Hanging Globes Put the Garden Above the Table Instead of on It
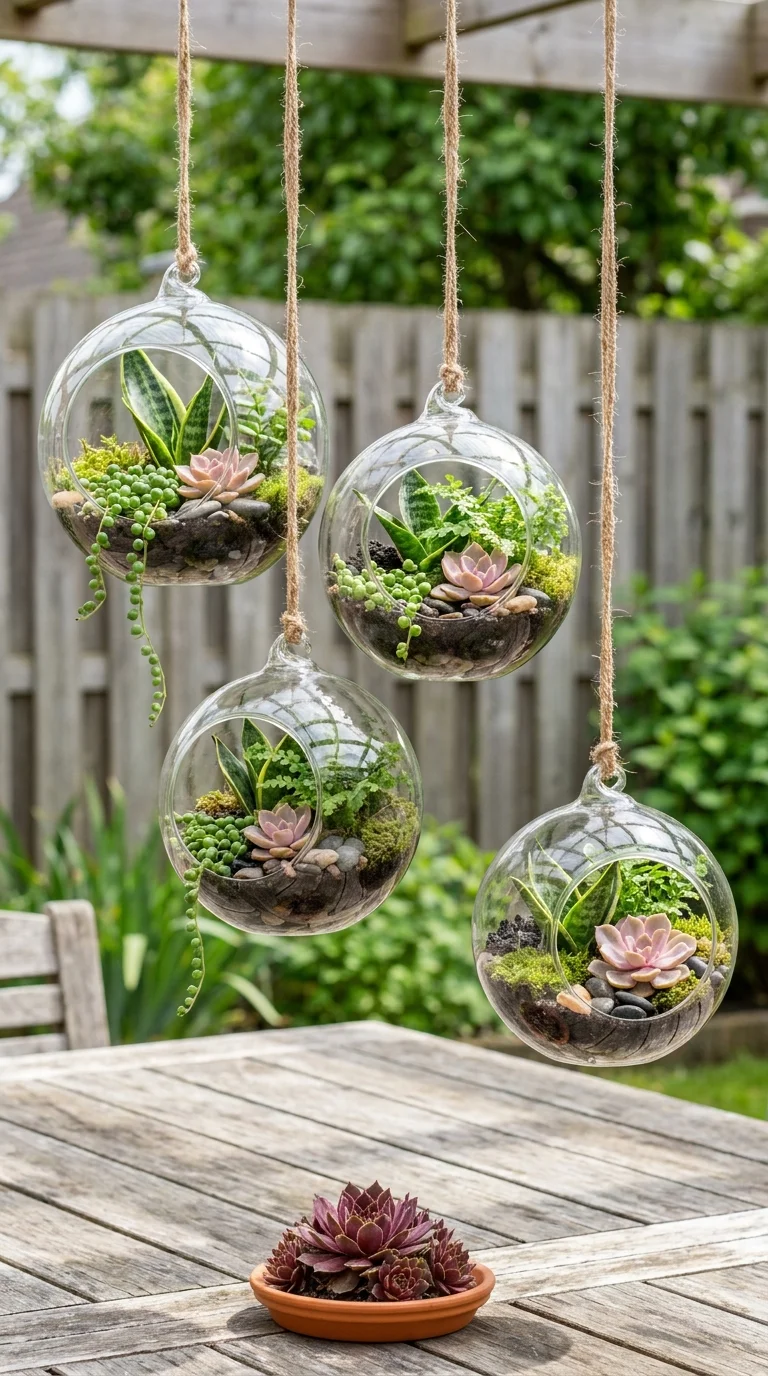
Hanging containers solve a problem flat ones can’t: no free surface. Four open-sided glass spheres hang from jute rope at staggered heights over an outdoor table, and each repeats the same recipe of a pink echeveria, a snake plant, trailing string-of-pearls, moss, and pebbles. That repetition is what turns four containers into one installation, and the uneven drops keep them from looking like a row of lamps. A hens-and-chicks rosette in a terracotta saucer on the table pulls the eye back down. For more ways to dress the space around them, browse our dreamy boho patios.
This works on balconies, pergolas, and small patios, and for anyone whose shelves are already full. The cost is upkeep: watering means taking a globe down, and overwatering is easy when the glass has no drainage. Rope weathers outdoors, so check it each season, and confirm the hook or beam can carry a soil-filled globe, which weighs more than it looks.
Start with three globes rather than four, use one plant mix in all of them, and vary the heights. Small glass jars in rope or macramé hangers make a cheaper stand-in. Avoid spots where afternoon sun hits the glass directly, since a round globe can concentrate sunlight onto the leaves. Bright, filtered light is safer.
How to Build a Toadstool Hill on a Wood Slice in One Afternoon
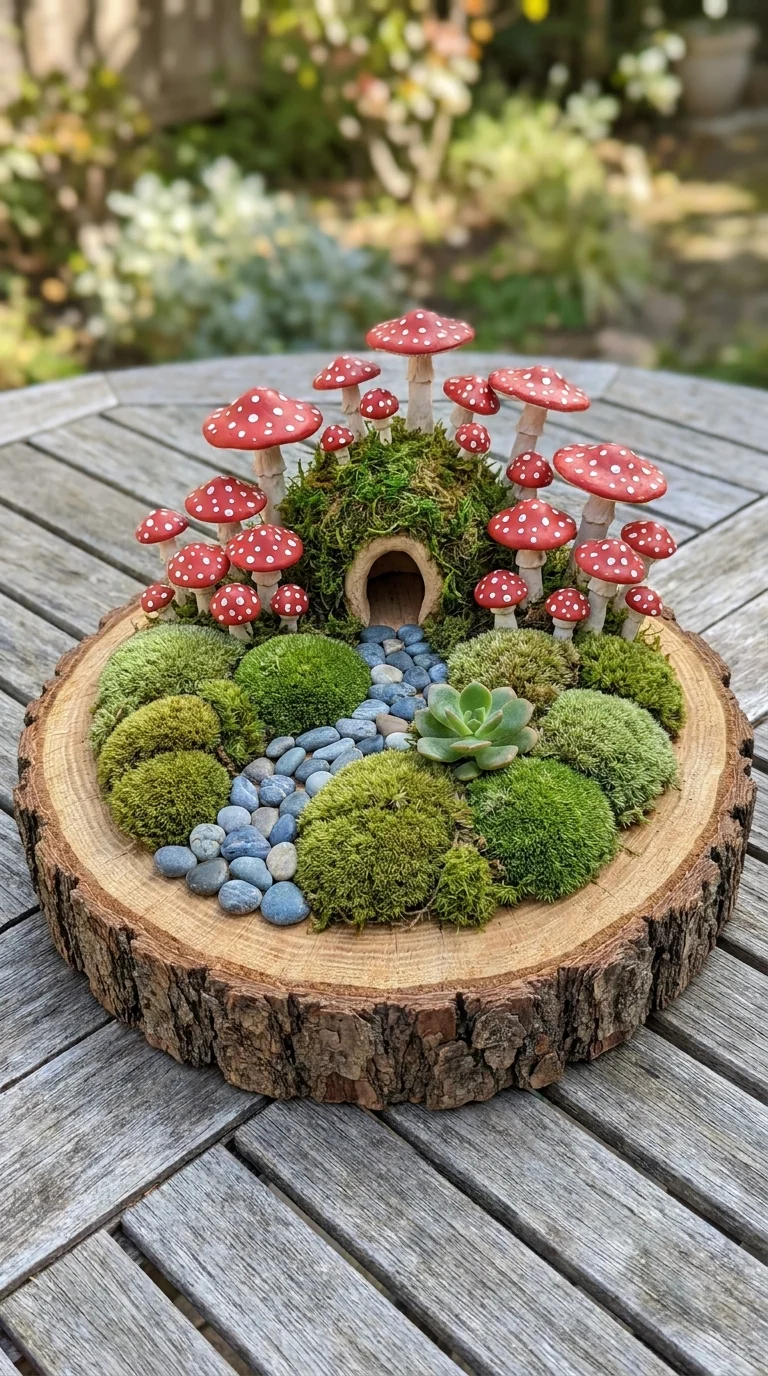
If this is your first build, start here. A bark-edged wood slice is the base, moss mounds make the terrain, a small arched door set into a larger moss hill becomes the home, and red-and-white toadstools ring it. A blue pebble path leads to the door, and one succulent adds a spiky living contrast. The red caps against green sit on opposite sides of the color wheel, which is why the scene looks lively from across a room.
The strongest advantage is speed. There’s no soil, no drilling, and no planting. It suits kids’ craft afternoons, table displays, and porch shelves. Build a small dome from air-dry clay or paper-mâché as the hill’s core, cover it with moss, then add the door, mushrooms, and pebbles. The toadstools look hand-shaped, so air-dry clay with acrylic white dots does the job, and a clear outdoor sealer protects them.
The moss decides how long it lasts. Preserved moss needs no water but fades in sun. Live moss stays green but needs misting, and it can stain and eventually rot an untreated slice, so set a shallow liner beneath it. Vary the mushroom heights so the group looks grown instead of bought as a set. Choose preserved moss and keep it indoors or under a porch roof.
A Pastel Echeveria Palette Spills Out of This Two-Tone Vase
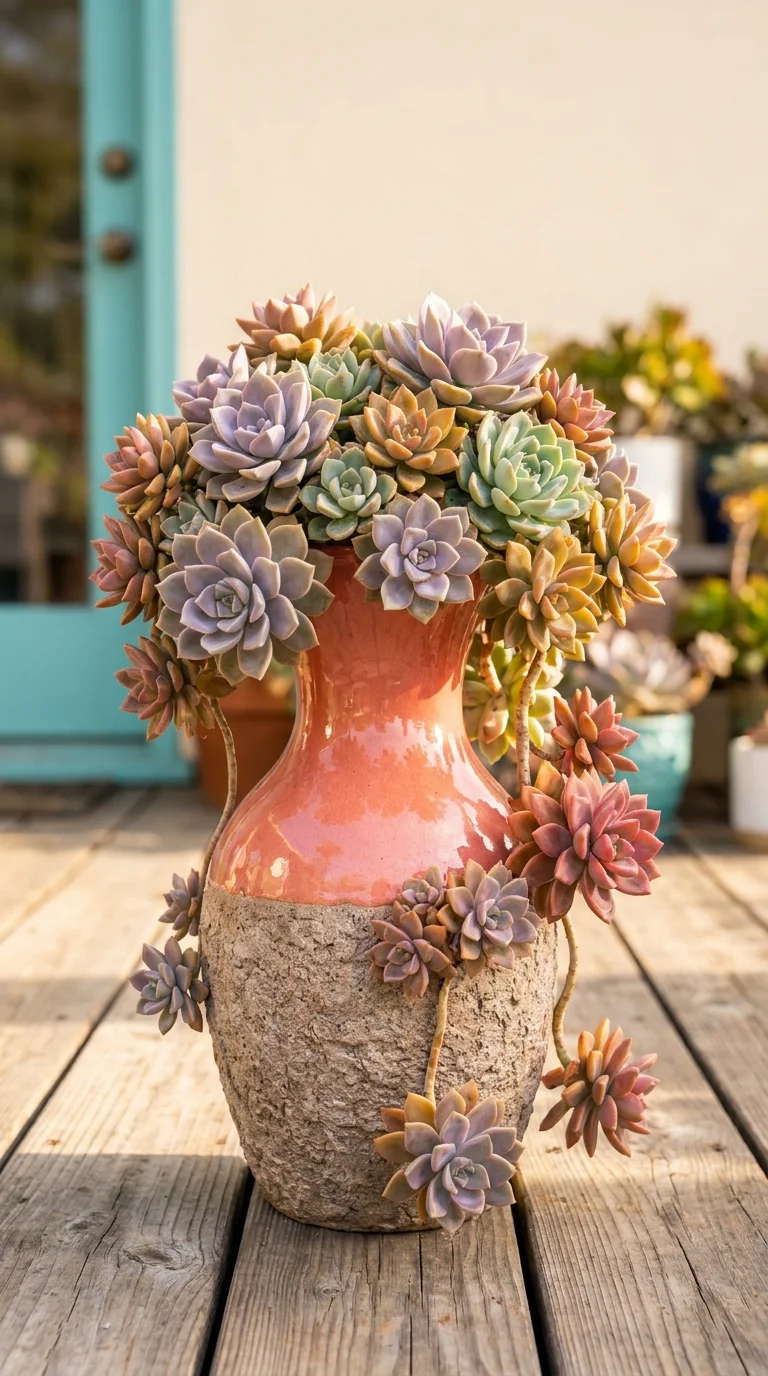
No figurines here. The plants are the miniature world: dozens of rosettes in dusty lavender, blush pink, sage green, and peach pour over the lip of a coral-glazed vase and trail down its rough, stone-textured base. The palette works because the glaze is warmer than any plant in it, so the vase carries the loudest color while the succulents stay soft. Several rosettes hang on visible stems, which gives the arrangement downward motion instead of a plain dome.
It suits porches, balconies, and anyone who wants the fairy-garden feel without fantasy props. Cost is manageable because echeveria propagate easily from leaves and stem cuttings, so a small starter purchase can fill a vase like this over a season or two. Light is the trade-off. These pastel shades tend to deepen with bright sun and cool nights and drift toward green in low light. Our indoor plant styling guide covers window placement.
Pick a vase with a drainage hole, or drop in a nursery pot, and use a gritty succulent mix. Buy three varieties, pack the rosettes tightly, and let cuttings fill the gaps. Five colors of the same lightness turn flat, so include at least one warmer or darker rosette, as the peach ones do here.
Three Stacked Spheres With Glowing Windows Bring Tiny Rooms Indoors
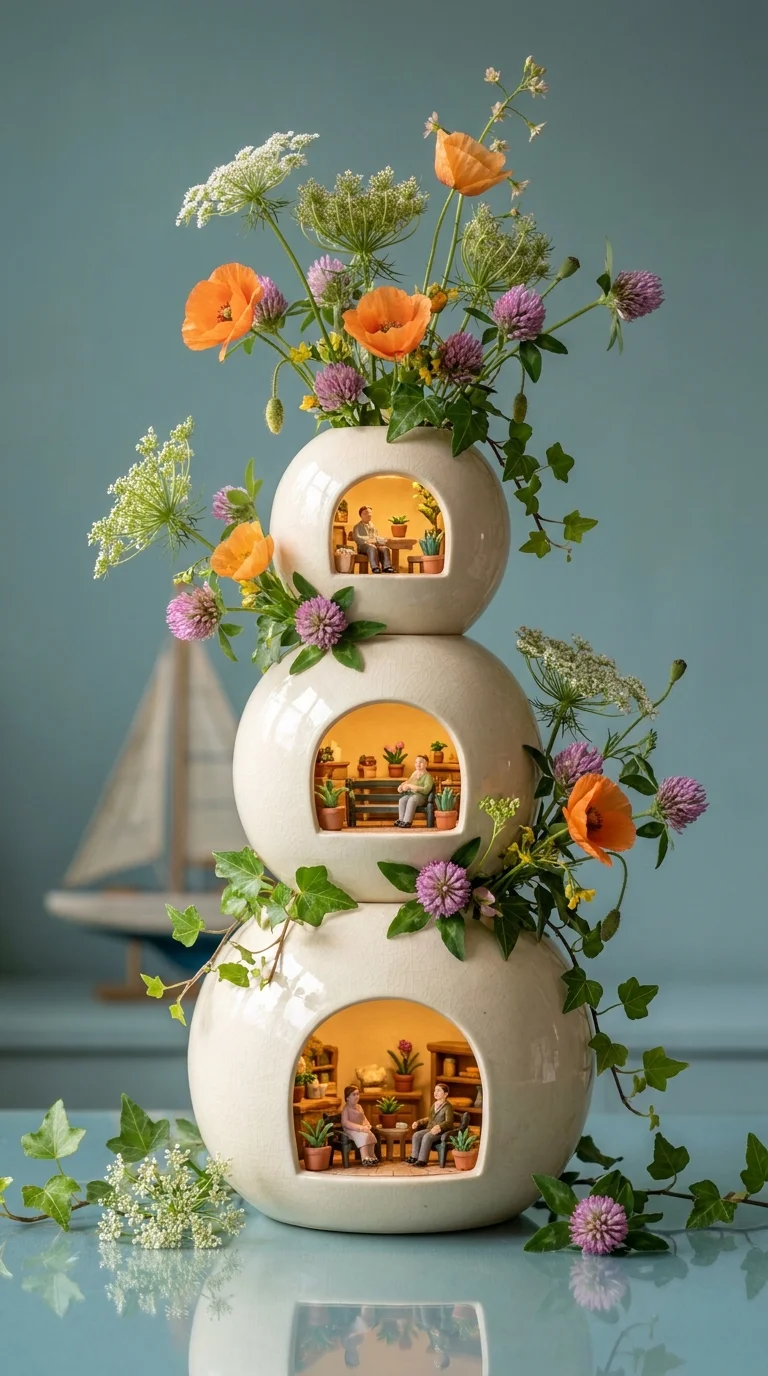
This is the indoor, dollhouse-style idea in the set. Three cream ceramic spheres stack like a snowman, each with an arched window that opens onto a lit miniature room: tiny tables, shelves, potted plants, and seated figures. Poppies, clover, Queen Anne’s lace, and ivy spill from the top and trail down the sides, so the tower reads as a house wearing a garden. The amber glow inside suggests small LED lights, and that glow makes the rooms feel occupied. If you like bringing greenery indoors, our biophilic living room guide has more to try.
Why the Stack Doesn’t Look Top-Heavy
The spheres grow larger from top to bottom, so the tower has a pyramid’s stability even while tall stems rise from the peak.
It suits a console, mantel, or dining table, and anyone who loves dollhouse detail. It’s indoors in practice, and cut flowers last days, not months. Making it means custom or heavily modified ceramics. A budget route uses paper-mâché or air-dry clay spheres, which a craft knife can cut, plus battery tea lights. The mistake to avoid is water reaching the lower rooms: put a glass jar inside the top sphere for the flowers, or use dried stems. Build one sphere first before committing to three.
A Lavender Cottage, a Potted Lavender Topiary, and One Smart Sun Decision
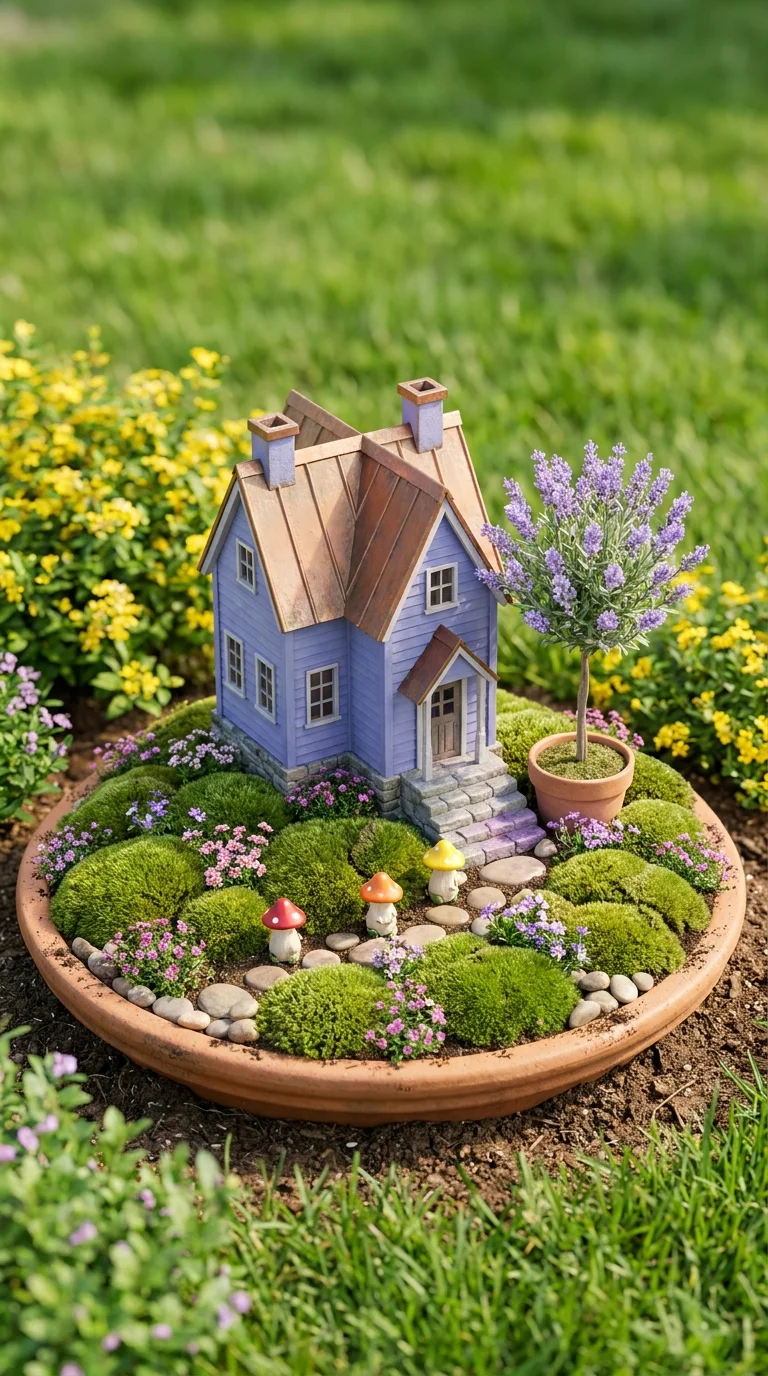
The lavender-painted cottage has a copper-toned roof and two chimneys, and a small lavender topiary in its own terracotta pot stands beside the steps. The pairing works for color, and the separate pot works for horticulture. Real lavender wants full sun and dry soil, while the moss mounds, pink blooms, and toadstool figures around the house prefer moisture and some shade. Giving lavender its own pot lets both live in one dish. Our fragrant balcony plant ideas suggest other scented plants for sunny spots.
The dish appears to sit right in a garden bed, so this suits sunny beds, patios, and gardeners who like a scene that ages outdoors. The strongest draw is a scented, pollinator-friendly plant beside a fantasy house. The compromise is the house itself, which has to be outdoor-rated (resin, cement, or well-sealed wood), because unsealed wood and paper-based houses soften in rain.
Choose the house first, then match a plant or paint color to it. To simplify, skip the topiary and use one small lavender start in a terracotta pot. If the moss stays soggy while the lavender sulks, they’re sharing a watering zone, and the lavender should move.
A Tortoise Carrying a Village Is Memorable, and Worth Building Carefully
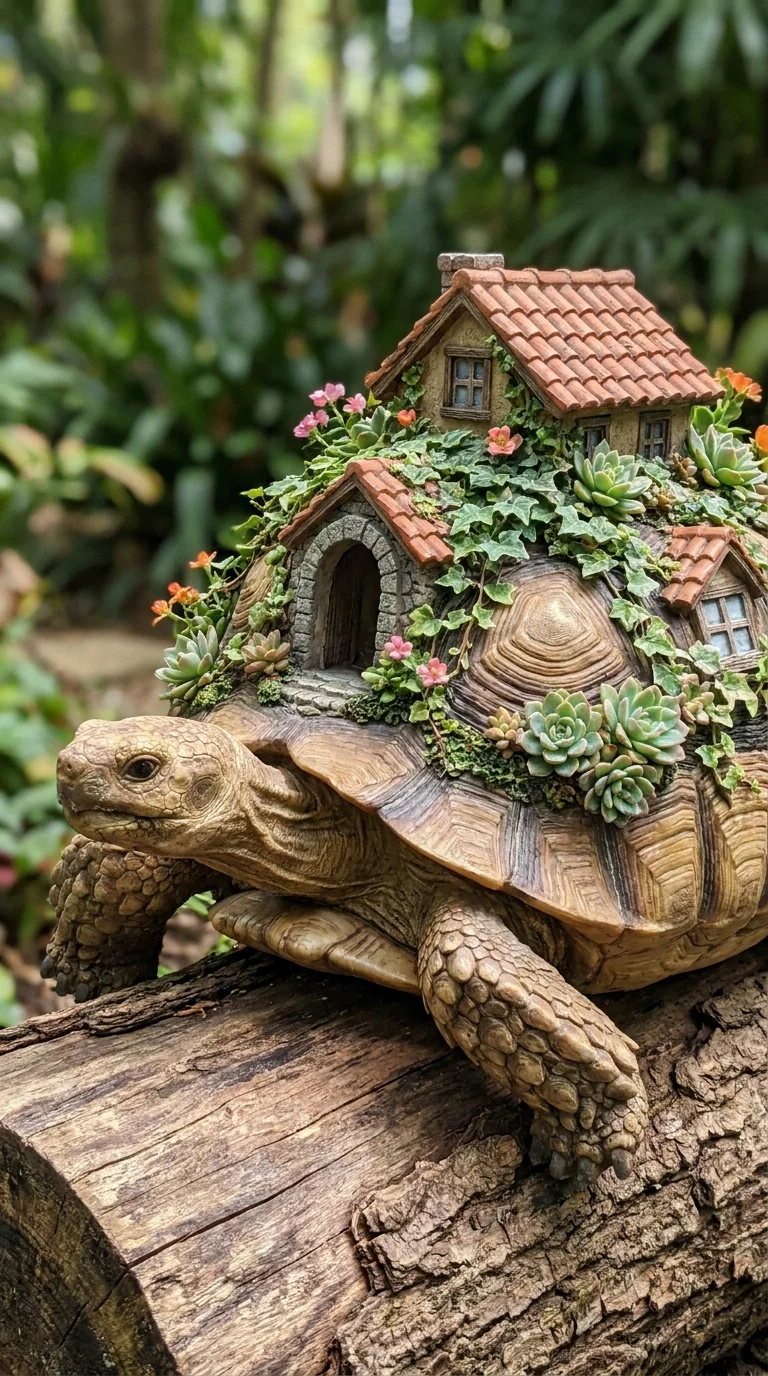
This is the boldest idea in the set. Tile-roofed cottages, a stone archway, ivy, small succulents, and pink blossoms climb across a tortoise’s domed shell, and the shell’s growth rings give the houses a hillside to sit on. The photo is hard to read, and that matters: build this on a statue or planter shaped like a tortoise, and never on a live animal.
It suits garden paths, stumps, and covered patios where a piece can be a destination, and it delivers a story with few plants. The compromise is soil depth. Shell pockets are shallow and dry out fast, so stick with sedum, echeveria, and small-leaf ivy, which tolerate thin soil. Weight and stability matter too, so set it on level ground.
For a cast-stone or resin planter with a hollow back, secure small houses with exterior adhesive, then plant the pockets with gritty soil and moss. On a smaller budget, use one cottage. Too many buildings bury the shell markings that make the shape work.
Who Should Skip the Shell Village?
Skip it as a first project or if you want low upkeep. It combines adhesive work, tiny planting pockets, and steady watering, and a lopsided result looks like a mistake instead of a scene. If the idea won’t leave you alone, start with the tortoise and a single cottage, and add ivy once the first plants survive a season.
Thrift-Store Pitchers Turn a Stone Wall Into a Street of Tiny Gardens
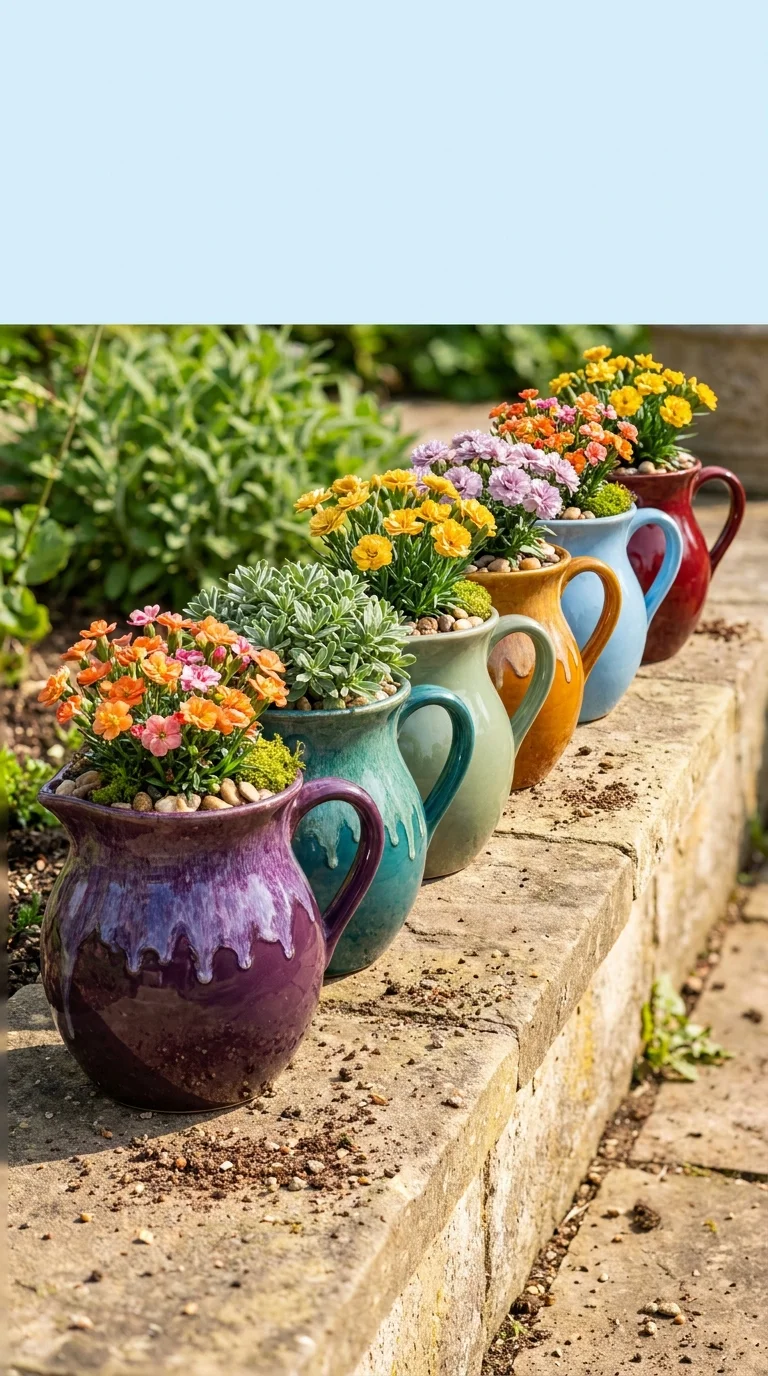
Six glazed pitchers in purple drip glaze, teal, sage, amber, sky blue, and deep red line a stone wall, each planted with a different bloom: orange and pink flowers that look like kalanchoe, yellow blooms, lilac carnation-type flowers, and a silvery succulent, all topped with pebbles and a little moss. Several pairs contrast on purpose, such as orange against purple and yellow against sage, which keeps the row lively instead of matched.
It suits steps, low walls, and porch rails, and anyone who likes collecting one container at a time. Cost is the draw, since mismatched pitchers at thrift stores and yard sales are easy to find. The compromise is drainage. Pitchers rarely have a hole, so roots can sit in water. Drill one with a diamond or ceramic bit under running water, or plant in a plastic nursery pot and slip it inside.
Pick three pitchers, choose plants with similar water needs, and finish with pebbles. Two pitchers still make a row. Avoid one oversized plant per pitcher, since it dominates the glaze. Drill your first pitcher before planting it. For more ways to layer color outdoors, try our boho garden ideas.
What Each Budget Level Buys Here
| Budget | Expectation |
|---|---|
| Low | Pebbles, air-dry clay toadstools, thrift-store pitchers, sheet moss |
| Medium | Resin cottages, glass globes, nursery succulents, sturdy hooks |
| Premium | Custom ceramic stacked spheres, cast-stone tortoise planter, a hollowed log trough |
Questions People Ask Before Planting a Fairy Container
Does every container need drainage holes?
Not strictly, but containers without them demand careful watering. Use a gritty mix, add water a spoonful at a time, or plant in a nursery pot that lifts out for draining. Succulents and cacti tolerate mistakes here the least.
Can moss and succulents share one container?
They can, but they want opposite conditions. Moss likes steady moisture and shade, while succulents prefer dry soil and bright light. Plant them in separate pots inside one scene, or keep moss to the shaded edge and away from the succulents’ roots.
How do I keep miniature houses from cracking or fading outdoors?
Choose resin or cast stone over paper or raw wood, and coat painted pieces in a clear outdoor sealer. In freezing climates, bring small pieces inside for winter, since trapped water can crack ceramics.
What size container should a beginner start with?
Aim for a shallow dish or bowl about a foot across. It holds a path, one building, and a few plants without needing constant adjustment, and a small mistake is easy to rebuild.
About the Team
The Aesthetic Life Team writes about home décor, garden styling, and small-space design for readers building rooms and outdoor corners they’ll actually use.
Choose the Container Before the Scene
Each setup above answers the same question differently: how much attention are you willing to give this? A wood slice with preserved moss asks for almost none, a cactus globe asks for restraint, and a lavender dish asks for sun and good drainage. Match the container to your watering habits and your light first, then pick the scene. A small fairy garden that suits your routine will look better in six months than an ambitious one that doesn’t.
Explore More
You may also enjoy: