

Cottagecore gardens work because they never look finished — they look found, like a corner of the yard that grew a personality on its own. But there’s a real design logic behind every one of these spaces, and once you see it, you can build it. Here are ten outdoor spaces that show exactly how storybook charm gets made, one decision at a time.
Quick Overview
| Style | Cottagecore |
|---|---|
| Best For | Backyard gardens, cottage-style homes |
| Budget | Low–High (scalable) |
| Difficulty | DIY-friendly, some professional steps |
| Maintenance Level | Medium–High |
A Miniature Gnome Village Built Into a Stone Planting Ring
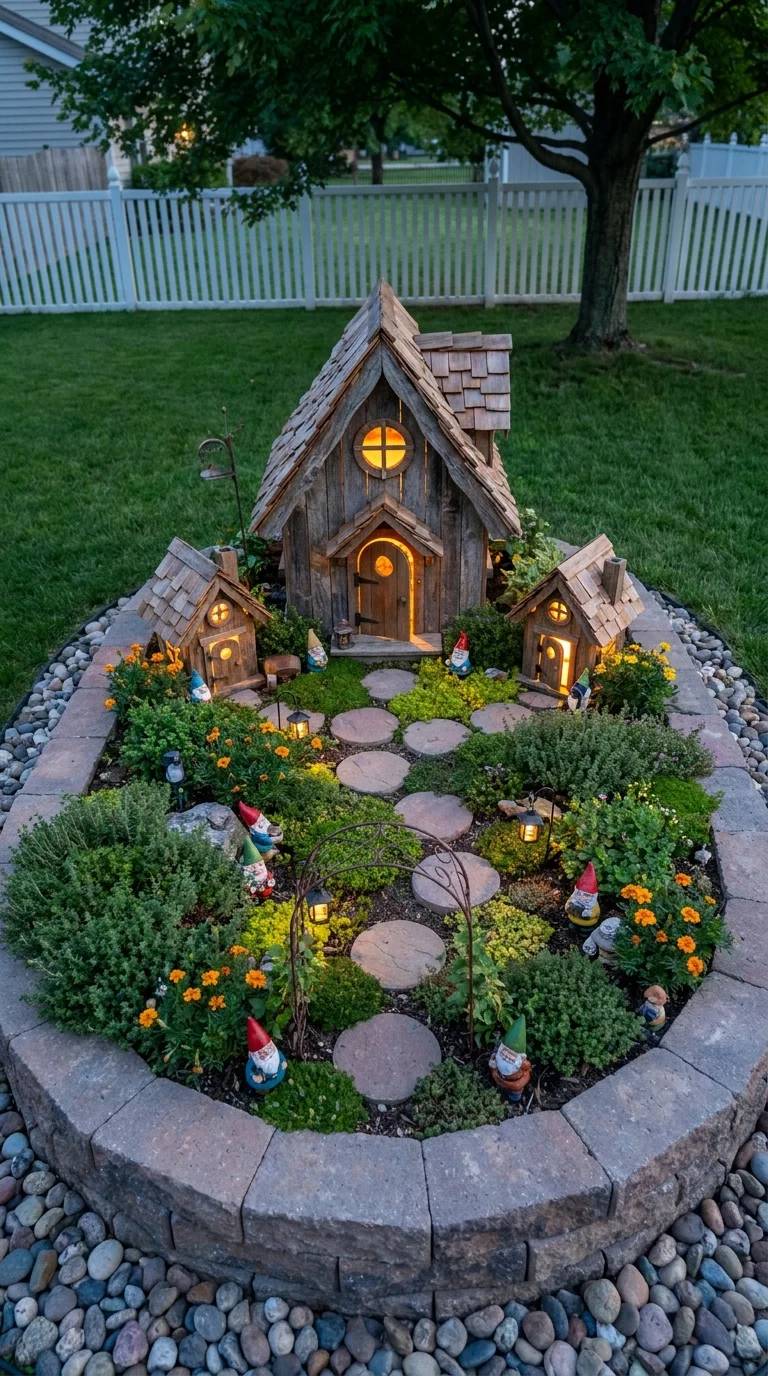
Most whimsical yards scatter a few figurines across a lawn and call it done. This one commits fully: three shingled gnome cottages, complete with round lit windows and their own stepping-stone path, sit inside a circular stacked-stone retaining wall that turns the whole bed into a self-contained miniature village rather than a handful of decorations. That containment is the defining move — the stone ring gives the eye a clear edge, so the tiny scale reads as intentional architecture instead of clutter.
The idea suits gardeners who want one strong focal point without redesigning the rest of the yard, and it particularly rewards households that actually spend evenings outside, since the solar lanterns and lit cottage windows only earn their keep after dusk. It works equally well as a standalone entry bed, a raised planter near a patio, or a quiet corner of lawn — anywhere it can be walked around and viewed from more than one angle. For anyone chasing a garden that feels lived-in rather than staged, this is the version built to be lingered over rather than just glanced at, and it’s the kind of full-personality space explored further in these outdoor spaces built around soul over symmetry.
The trade-off is upkeep at a small scale: tiny weeds read as forest overgrowth almost immediately, moss and thyme groundcover need regular trimming to stay lawn-height rather than shaggy, and the cedar shingle roofs weather unevenly without the same sealant schedule the real house gets. On a tighter budget, one gnome house instead of three, a mulch bed instead of the full paver ring, and basic string lights instead of individual solar lanterns still tell most of the same story. The best sequencing is to build the stone ring and let the plantings fill in over a season before adding every figure — that patience is what keeps it from looking store-bought on day one.
Where the Eye Lands First
The tallest cottage’s round, amber-lit window is the first thing the eye catches, and that’s not an accident — it sits at the highest point in the composition, its warm light contrasts hardest against the dark shingles around it, and the stepping-stone path physically leads toward it. Repeating that lit-window detail on the two smaller cottages, at slightly different heights, is what keeps the eye moving through the whole scene instead of stopping at just one house.
Recommended Materials: cedar shake shingles, reclaimed barn wood, stacked fieldstone edging, moss and creeping thyme groundcover, gravel mulch, solar-powered lanterns
Main Colors: Weathered Barn Gray, Warm Amber Glow, Marigold Orange, Moss Green
Best Lighting: warm-white solar lanterns paired with the lit cottage windows themselves as the true light source after dusk
Groundcover and Wood Upkeep: thyme and moss need seasonal trimming to stay path-height, and the cedar shingles benefit from a yearly wood sealant pass to keep their color even.
Easy Ways to Undersell This Idea
- Buying every figurine before the planting fills in, so the bed looks cluttered instead of layered
- Skipping a lighting plan entirely, leaving the scene dark exactly when the story reads best.
- Ignoring drainage inside the stone ring, since compacted soil under edging holds water and drowns roots
- Mixing plastic figurines with the wood cottages, which breaks the material consistency that sells the illusion
Turning Two Wine Barrels Into a Bench That Also Blooms
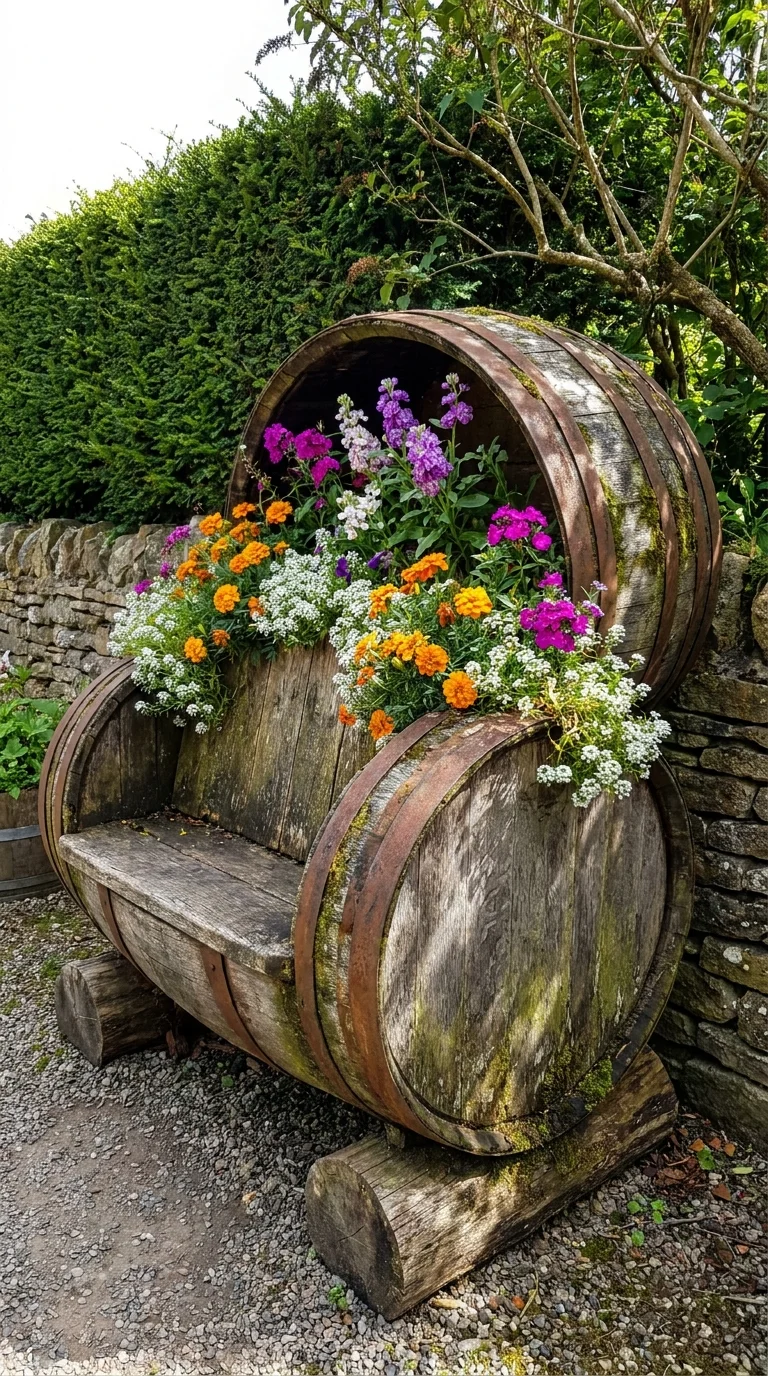
Two halved wine barrels, stacked and joined, form both the seat and the overflowing planter behind it — this is the one design in the group that solves two problems with one object instead of treating seating and planting as separate purchases. The genuinely reclaimed barrel wood does most of the emotional work here; the oak has already silvered, and the iron hoops have already rusted to a soft orange that happens to sit beautifully next to magenta and white blooms rather than clashing with them, which is exactly the kind of unplanned material harmony that makes reclaimed pieces feel earned rather than staged.
It’s a strong fit for renters and small-yard owners who want instant character without a built structure, tucked along a wall, at the end of a path, or in a courtyard corner where it can be approached from the front. The catch is durability: barrel wood and iron hoops will eventually rot or rust further in consistently wet climates, and the barrel’s curve limits how comfortable the seat back actually is for long sitting. Drilling proper drainage holes in the planting half before filling it with soil, and sealing the interior wood first, both meaningfully slow that decline. On a budget, a single half-barrel planter set beside a regular bench gets close to the same look without the joinery work the full barrel-bench requires.
Why the Rust Reads as a Feature, Not a Flaw
Untreated oak and iron don’t usually get left to weather on purpose — most furniture gets sealed to stop this exact process. Here it’s the opposite: letting the barrel silver and the hoops rust is what gives the piece its patina, and because the surrounding blooms are warm-toned (marigold, magenta, white), the rust color actually extends the planting’s palette onto the furniture itself rather than competing with it.
Recommended Materials: reclaimed oak wine barrels, rusted iron hoops, well-draining potting mix, trailing and upright annuals (stock, marigold, sweet alyssum)
Main Colors: Weathered Oak Brown, Rust Orange, Magenta and Purple Bloom, Sage Green foliage
Best Lighting: full, direct sun is needed for this bloom mix to perform; placing it against a dark hedge gives the flowers the most contrast
Barrel and Bloom Upkeep: deadhead regularly to keep the display full, reseal the barrel wood yearly, and keep an eye on hoop rust so it stays cosmetic rather than structural.
Where This Setup Goes Wrong
- Skipping drainage holes in the planting half, which drowns roots in standing water
- Overfilling with tall, stiff-stemmed plants that block access to the seat back
- Leaving the seat boards unsealed, which leads to splinters within a season or two.
- Setting the barrels directly on grass instead of gravel or pavers, so ground moisture accelerates rot from below.
A Porch Garland That Turns a Cream Victorian Into a Blush Fairytale
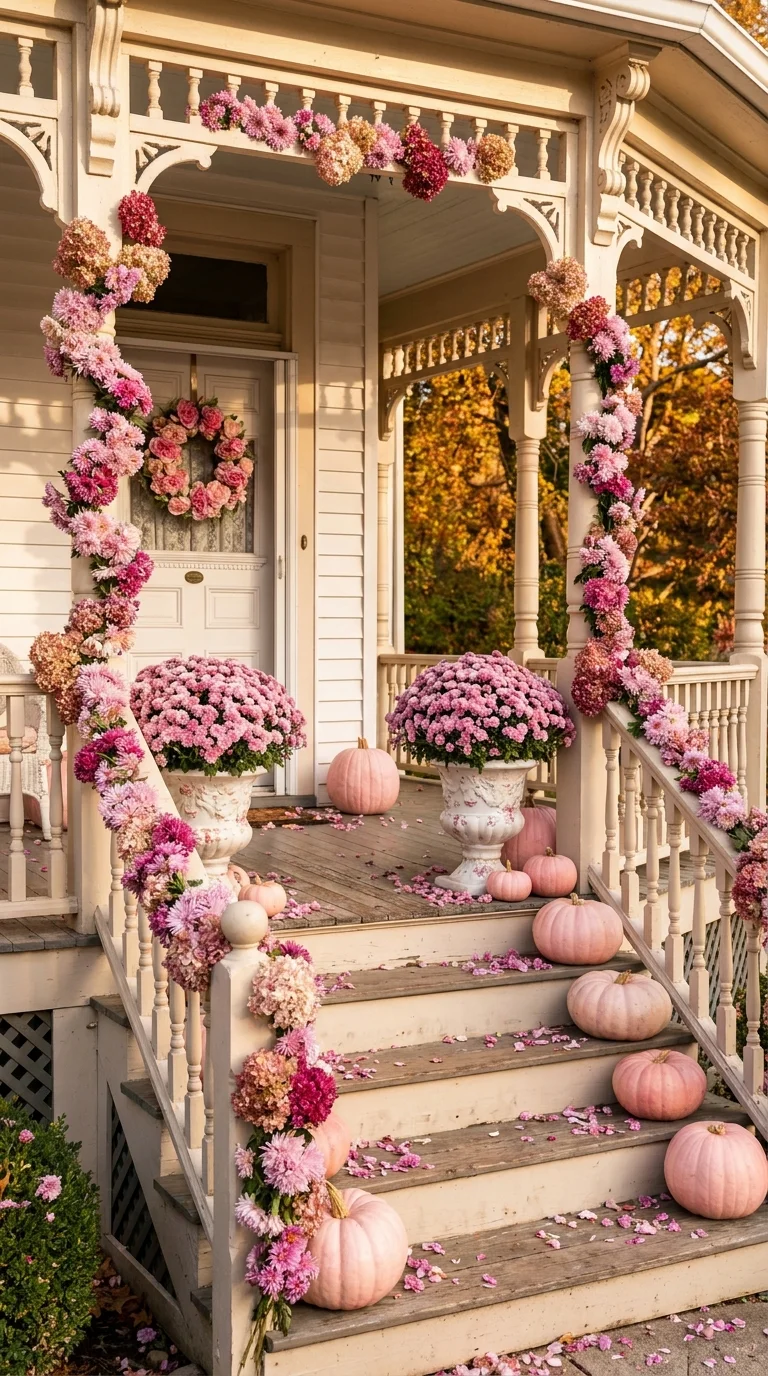
Every other space in this list involves new planting or building. This one doesn’t — it’s an existing Victorian porch, wrapped and wound with a floral garland along the railings and gable trim, paired with urns of mums and a run of blush-toned pumpkins down the steps. It’s the only entry here built entirely as a seasonal decorating technique layered onto architecture that was already there, which makes it the easiest one to undo if the look ever needs to change.
The garland’s success depends on scale: it’s thick enough to actually register against the porch’s ornate gingerbread trim, rather than disappearing into it, and the palette stays in a tight blush-to-mauve range so the whole composition reads as one graduated color rather than a mix of unrelated pinks. That combination suits people with ornate or heavily trimmed porches who want a seasonal refresh without touching the landscaping, and it particularly rewards hosts — the effect reads best from the street, which is exactly where guests arrive.
The honest trade-off is longevity. A fresh floral garland will wilt within days outdoors no matter how it’s cared for, and pink-painted or naturally pale pumpkins fade fast in direct sun. A dried or preserved garland trades a little bit of vibrancy for weeks instead of days, and it’s the more realistic choice for anyone who isn’t replacing the display constantly. On a smaller budget, skipping the full garland in favor of simple post swags plus two matching urns still captures the same color story with a fraction of the material.
A Palette That Never Breaks Its Own Rule
The garland stays in one graduated pink family — blush at the lightest, deepening toward berry and mauve — instead of introducing a second unrelated color. That restraint is what lets the eye read the whole porch as one continuous gesture rather than a collection of separate decorations stacked next to each other.
Recommended Materials: dried or preserved hydrangea and mum garland, ceramic urns, blush-toned decorative pumpkins, twine or wire garland base
Main Colors: Blush Pink, Dusty Mauve, Cream, Berry Red accents
Best Lighting: soft, golden-hour side light flatters the pink gradient far more than harsh midday or overhead spotlighting
Details That Undo the Effect
- Choosing a garland too thin for the porch’s trim scale, so it disappears instead of framing the entry.
- Mixing warm and cool pinks that clash rather than graduating smoothly from light to deep tone
- Leaving pumpkins directly on unsealed wood steps, where trapped moisture stains the paint underneath
- Wrapping the railing so densely that guests can no longer use it to steady themselves going up the steps
A Greenhouse Wearing Its Plumbing Like Jewelry
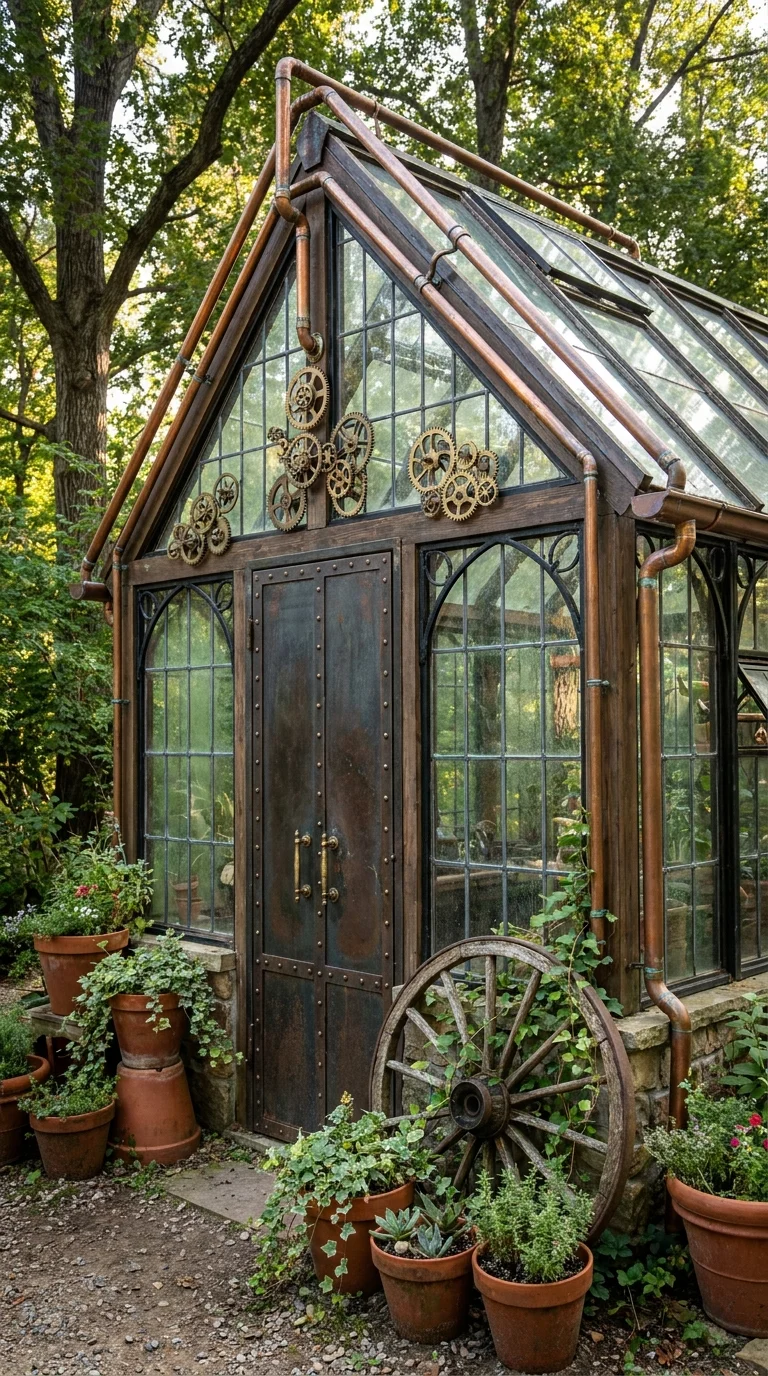
Where a typical greenhouse hides its roof drainage and venting behind clean lines, this one puts that plumbing on display and treats it as the main ornament: exposed copper piping traces the roofline, cast gear clusters cluster at the gable peak, and a riveted, blackened steel door anchors a wagon wheel leaning against the stone base. It’s the only structure in this group that turns its own utility into decoration rather than treating decoration and function as separate layers, and that single choice is what makes it unmistakable even without a single flower in frame.
This idea belongs to people who genuinely enjoy building things — DIY tinkerers and maker-culture gardeners who want a structure that reads as a piece of art whether or not anything is blooming nearby. It’s a strong match for exteriors already leaning industrial or reclaimed, the kind of material mixing covered in more depth in these exterior looks that pair natural materials with unexpected curb-appeal choices. The real cost here is skill and money: genuine copper detailing needs either soldering ability or a fabricator, and it isn’t cheap at any scale. A more accessible version paints a standard aluminum greenhouse frame in a bronze or copper tone and bolts a few salvaged gears near the door only, which captures the theme without the plumbing-grade materials.
One Shape, Repeated Three Times
The gear motif shows up at the gable peak, near the door hardware, and again in spirit through the wagon wheel’s circular silhouette — three variations on “mechanical circle” that tie the whole facade together. That repetition is doing more work than any single gear could on its own; pull one instance out, and the facade would likely read as randomly decorated instead of designed around one idea.
Recommended Materials: copper piping, salvaged gears and cogs, blackened steel door hardware, leaded glazing bars, a reclaimed wagon wheel, terracotta pots
Main Colors: Aged Copper, Charcoal and Black Iron, Warm Terracotta, Forest Green foliage
Best Lighting: dappled woodland light filtering through the glass roof suits the aged-metal look; true growing use inside would need supplemental grow lighting
Metal and Glazing Upkeep: copper patina needs occasional monitoring so it ages rather than corrodes, and glazing seals should be checked yearly to prevent real leaks under the exposed pipework.
Where the Illusion Breaks
- Mixing shiny lacquered copper with already-rusted iron with no transition material, so the eye reads two unrelated projects.
- Bolting gears on in spots that couldn’t plausibly connect to anything functional, which breaks the “this could actually work” illusion
- Skipping proper flashing under the decorative roofline piping, which turns a design detail into a real leak
- Pairing very clean, modern glass with heavily aged metalwork, which fights the weathered story everywhere else
The Roof That’s Also the Garden’s Best Planting Bed
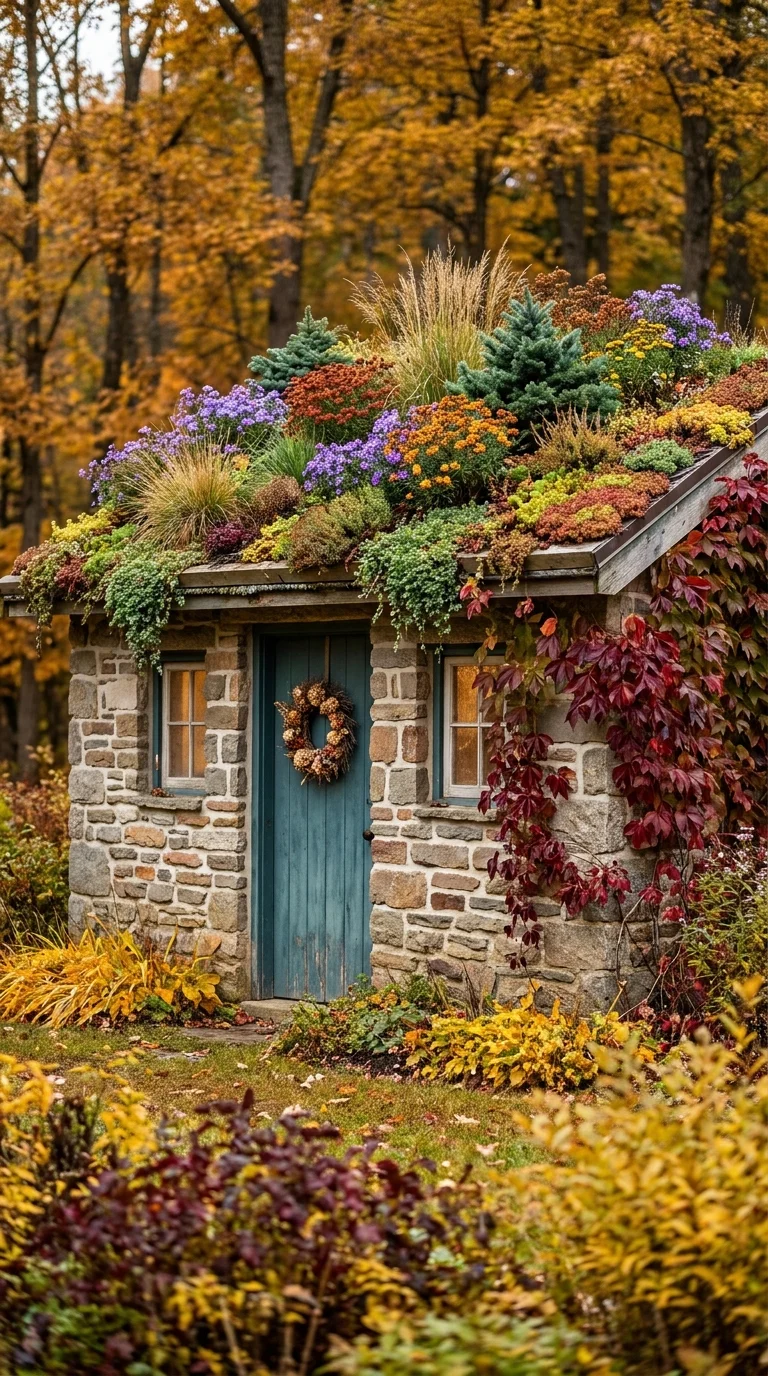
Every other space here treats the building as a backdrop for planting nearby. This fieldstone shed does something structurally different: dwarf conifers, ornamental grasses, sedum mats, and asters grow directly on the roof itself, so the building and the garden bed are the same surface. That’s the one defining fact that separates it from the rest of the set — there’s no ground-level bed competing for attention, because the roofline is the bed.
It’s the strongest option for small-lot owners trying to reclaim usable planting area without expanding their footprint, especially anyone already planning to build a shed and willing to add the extra roof structure while it’s underway — the kind of project worth pairing with other details that make an outdoor build feel genuinely finished rather than left half-done. The honest complication is structural: a living roof needs a proper waterproof membrane, root barrier, and a roof deck rated for the added weight, and plant choices are limited to shallow-rooted, drought-hardy species — the taller dwarf conifers shown here are the one detail worth a professional structural opinion before copying directly. A sedum-only mat, without the taller accent plants, is a meaningfully lighter and lower-maintenance version of the same idea.
Why This Roof Changes Color So Completely by Season
Ground-level beds get partially shaded by fences, trees, and buildings; a roof planting sits in open sky most of the day, which means it swings through fall color — the gold and rust shown here — far more dramatically than a comparable bed at ground level would. That’s a genuine advantage for anyone who wants a garden feature that visibly marks the seasons.
Recommended Materials: fieldstone walls, waterproof membrane and root barrier, lightweight growing medium, sedum and drought-tolerant perennial mix, dwarf conifers, reclaimed wood door
Main Colors: Weathered Teal (door), Warm Gold and Rust (fall foliage), Sage and Moss Green, Stone Gray
Best Lighting: full sun across the roof plane for the plantings to thrive; the recessed door stays naturally shaded
Living Roof Upkeep: seasonal weeding, membrane inspections, and occasional plant replacement are all part of owning this feature, not optional extras.
Where a Living Roof Goes Wrong
- Skipping the root barrier layer, which lets roots damage the waterproofing underneath over time
- Adding soil depth beyond what the roof structure was actually rated to hold
- Choosing plants that need regular irrigation on a surface that’s genuinely hard to water consistently
- Leaving no safe access point for maintenance, so weeding becomes a ladder problem nobody actually does.
A Bench Where the Roses Do the Upholstery Work
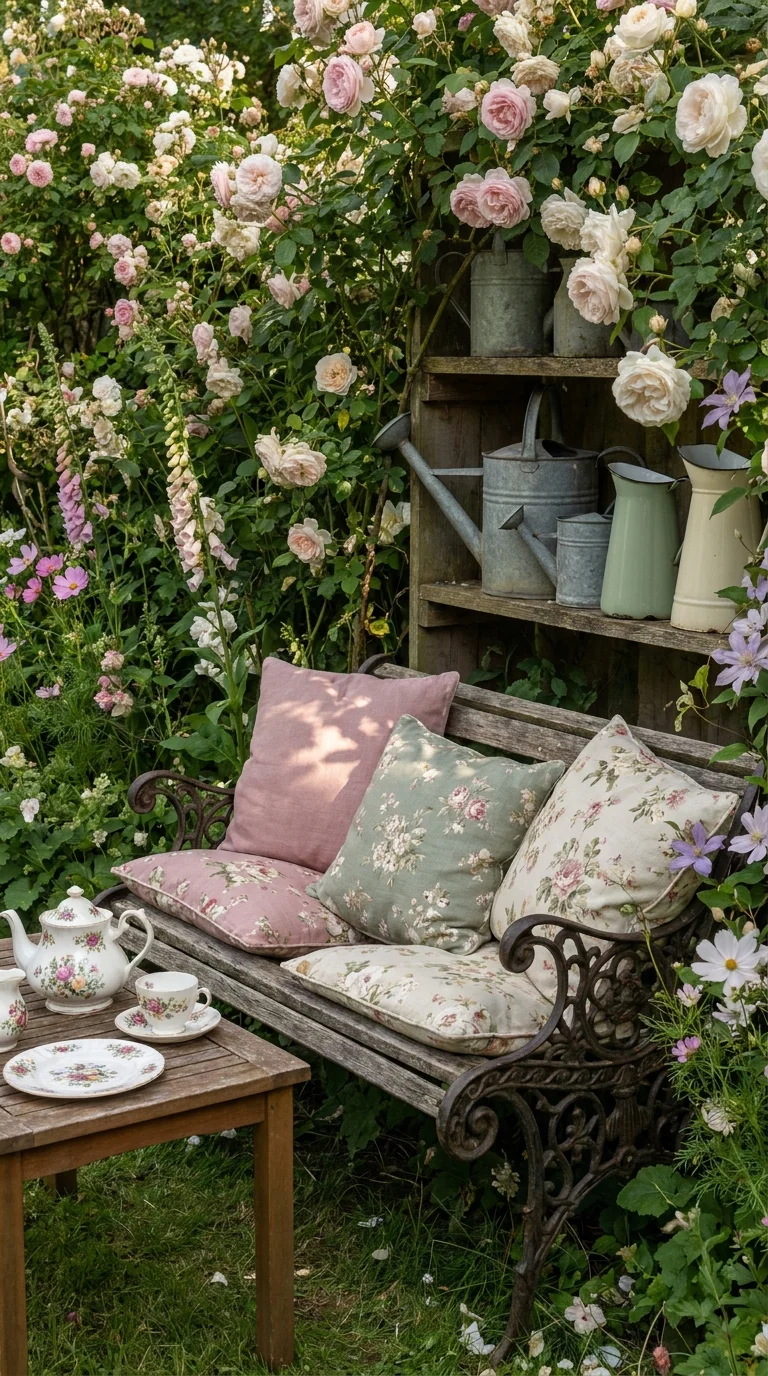
This is the one seating spot in the group styled like an actual room moved outdoors: a wrought-iron bench piled with graduated floral cushions, a ladder shelf holding vintage watering cans, and a small table set with matching china, all framed by climbing roses and clematis overhead. Every other outdoor seat in this list is defined by its structure or material; this one is defined by its textiles and tableware, which is what gives it the strongest “storybook” payoff of the entire set — it engages sight, and implicitly touch and taste, in a way hardscape alone can’t.
It’s built for entertainers and slow-morning people, anyone who wants an outdoor “room” for tea or reading rather than a passthrough seat, and it needs an established wall, fence, or trellis behind it for the climbers to actually cover before it looks anywhere near this full. That level of soft-furnishing styling has a direct cousin indoors, too — the same layered, floral-cushion instinct shows up in these warm, cozy country interiors built around timeless textiles. The real-world catch is maintenance: fabric cushions need to be weatherproof-rated or brought inside regularly, ironwork needs occasional rust treatment, and the china shown is styling, not a permanent outdoor fixture. A lighter version uses two cushions instead of four and a single climbing plant instead of layering roses with clematis.
Why Three Stacked Cushions Read as Lush, Not Cluttered
The cushions graduate in size from front to back rather than repeating the same size three times, which gives the pile visual weight and depth instead of looking like a pile of identical pillows. Swap in three same-sized cushions and the same bench would likely start to look overstuffed rather than intentionally layered.
Recommended Materials: wrought iron bench, weather-resistant floral cushions, climbing roses and clematis, vintage galvanized watering cans, ceramic tea set
Main Colors: Blush Rose, Sage Green, Cream, Dusty Lavender
Best Lighting: dappled afternoon shade cast by the climbers overhead is part of the design here, not an accident to work around
Textile and Climber Upkeep: cushions need airing out or seasonal storage, and the climbing plants need pruning to keep them from collapsing onto the seat below.
What Trips People Up Recreating This
- Choosing indoor-only fabric cushions that mildew outdoors within a single season
- Letting the climbing plant grow unsupported until it sags directly onto the seating area
- Picking a backless bench, which cushions alone can’t fully compensate for in comfort
- Layering too many competing floral prints with no plain or textured pillow to give the eye a rest
A Cat Tower Carved Straight Out of a Tree Trunk
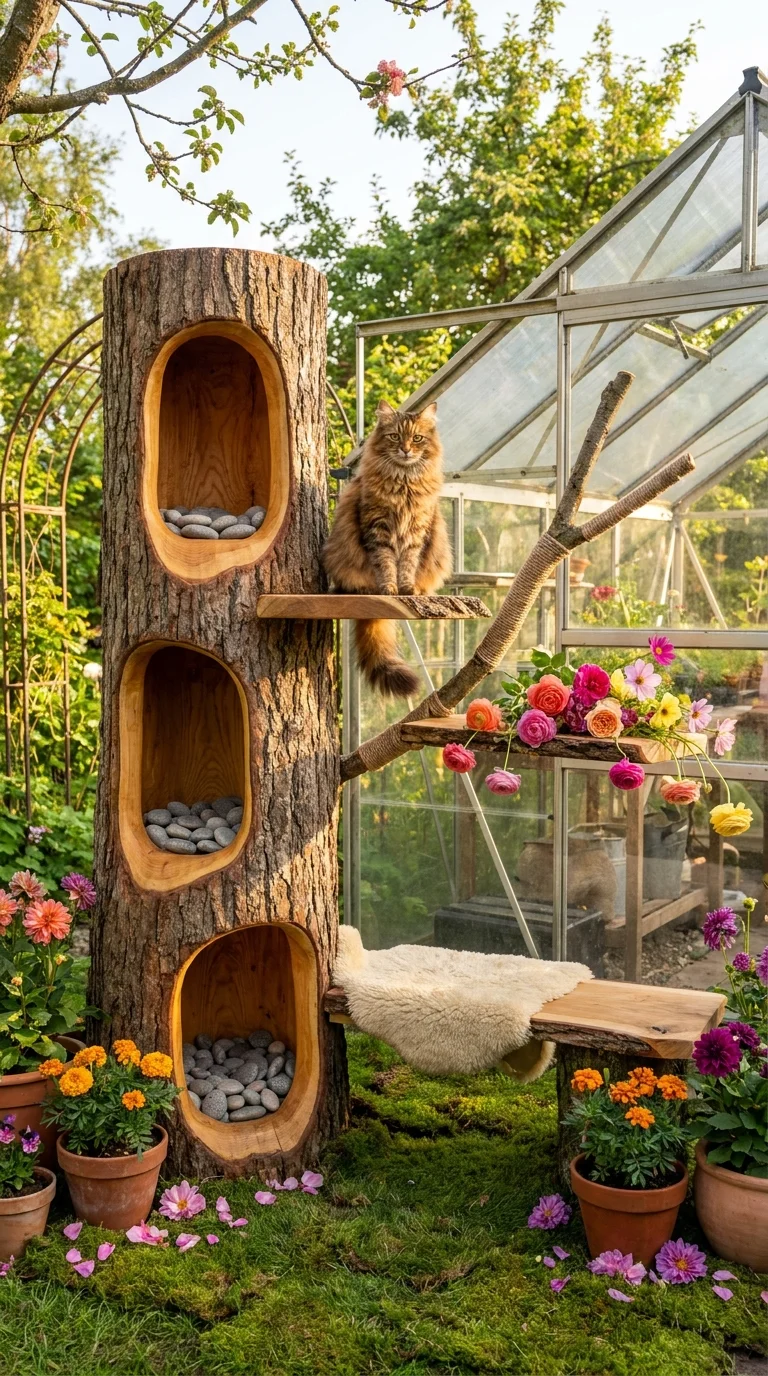
Every other feature in this list is built for people to look at or sit in. This vertical log — carved into three stone-lined dens, fitted with a live-edge shelf and a rope-wrapped branch perch, topped with a sheepskin daybed — is built for a cat to actually use, which makes it the only genuinely function-first, animal-centered piece here. It manages to solve outdoor pet enrichment while still speaking the same raw-material, cottagecore language as everything around it.
It’s a natural fit for households with supervised outdoor or catio access who want garden features with a real job beyond decoration, tucked into a protected corner near a greenhouse or covered porch edge rather than an open, unsupervised yard. The trade-offs are practical rather than stylistic: real logs weather and can eventually host pests or rot, exposed upper perches need some shelter from rain to actually get used, and this only makes sense where outdoor access is supervised or enclosed in the first place. A simpler version keeps a single carved den and one branch perch, skipping the sheepskin layer and extra tiers.
The Log’s Own Built-In Staircase
The three carved dens sit at increasing heights up the trunk, each a dark oval against lighter bark — that vertical rhythm is what pulls the eye upward toward the cat itself, almost like a built-in staircase for attention. Remove the middle den and the eye would likely jump straight from bottom to top instead of climbing naturally.
Recommended Materials: reclaimed log or tree trunk, smooth river stones, live-edge wood shelf, natural jute rope, sheepskin throw
Main Colors: Natural Bark Brown, Warm Honey Wood, Stone Gray, soft Cream
Best Lighting: partial shade is essential; the stone-lined dens get uncomfortably hot in direct summer sun
Wood and Stone Upkeep: reseal the wood periodically, keep the lining stones clean, and launder the sheepskin regularly if it stays outdoors.
Common Mistakes With This Kind of Feature
- Skipping a pet-safe wood sealant, letting bark and rot flake directly into fur and paws
- Placing it in full sun with no shade, which most cats will simply avoid using in summer
- Using rope or twine that frays into loose strands a cat could ingest
- Positioning it right against a fence or greenhouse a cat could use as a launch point to escape the yard
A Roofline Curved Soft Enough to Look Thatched Without Being Thatched
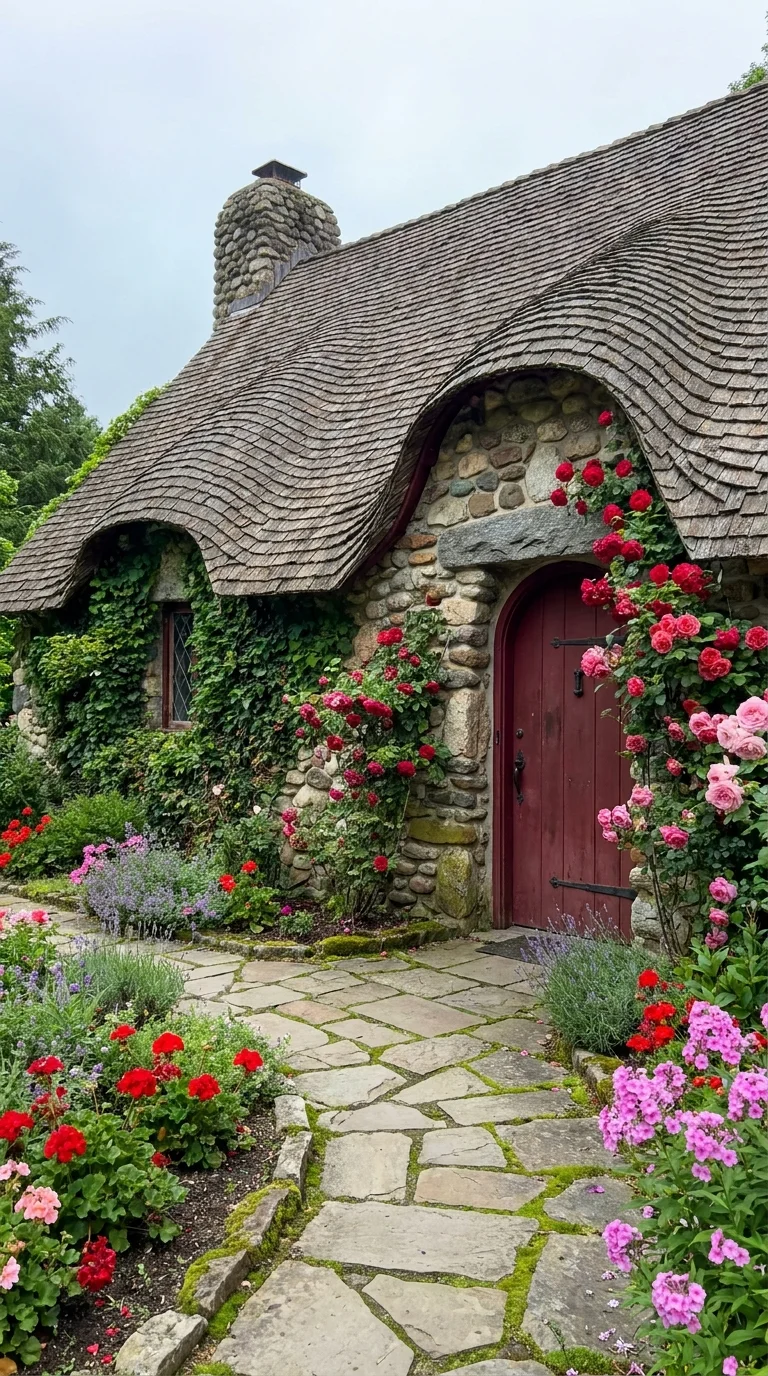
Every other cottage in this list leans on plantings to earn its storybook feeling. This one doesn’t need to: the cedar shingles are laid in a rounded, wave-like curve at the eaves that mimics a traditional thatched roof, so the roofline itself — not the roses climbing beside it — is doing the fairytale work. That’s a meaningfully different strategy than anything else here, and it’s arguably the most durable one, since it doesn’t depend on anything staying in bloom to read correctly.
It suits homeowners drawn to thatched-cottage silhouettes who still want a fire-rated, insurable roofing material, and it works as a whole-house exterior strategy rather than a single garden feature — the roof does most of the visual work, leaving the plantings free to be relatively simple. The honest cost is skilled labor: a curved shingle detail like this needs an experienced roofer, and it runs noticeably higher than a standard straight eave. A lighter version keeps a conventional roofline but pairs a single saturated door color with one climbing rose, borrowing the same warmth without the specialty roofing.
Worth the Investment? The curved eave detail is the single most expensive line item in this whole feature, and it’s also the one thing here that can’t be faked with paint or plants — a straight roofline with roses still looks like a house with roses on it, while the curved eave changes the building’s actual silhouette. For anyone building or re-roofing a cottage-style home from scratch, this is worth prioritizing over almost any other detail on this list; for anyone retrofitting an existing straight roofline, it’s rarely worth the cost of reshaping just for the look.
Why the Shingles Won’t Age Evenly — and That’s the Point
The curved sections at the eaves catch more direct sun and rain than the flatter roof planes above them, so they’ll silver and weather noticeably faster. That uneven aging is actually part of why curved, thatch-look roofs read as genuinely old rather than manufactured — a perfectly uniform gray roof would look less convincing here, not more.
Recommended Materials: fieldstone walls, curved cedar shake roofing, stacked-stone chimney, arched wood door, climbing roses and geraniums
Main Colors: Deep Barn Red (door), Weathered Stone Gray, Cedar Brown, Rose Pink and Red accents
Best Lighting: soft, overcast light flatters the stone texture far more than harsh direct sun
Stone and Roof Upkeep: control roof moss buildup, keep climbing roses pruned away from the eaves and gutters, and match any mortar repointing carefully to the original stone color.
Where This Look Falls Apart
- Choosing a door color too close to the surrounding stone tone, which erases the focal point entirely
- Skipping the curved eave detail for standard straight-cut shingles, which loses the storybook silhouette this depends on
- Letting climbing roses grow directly into the roofline gutters and shingles, trapping moisture underneath
- Mismatching new stone repairs to the original wall color, creating an obvious, unintentional patch
A Shed Entrance Turned Into a Wall of Hanging Color
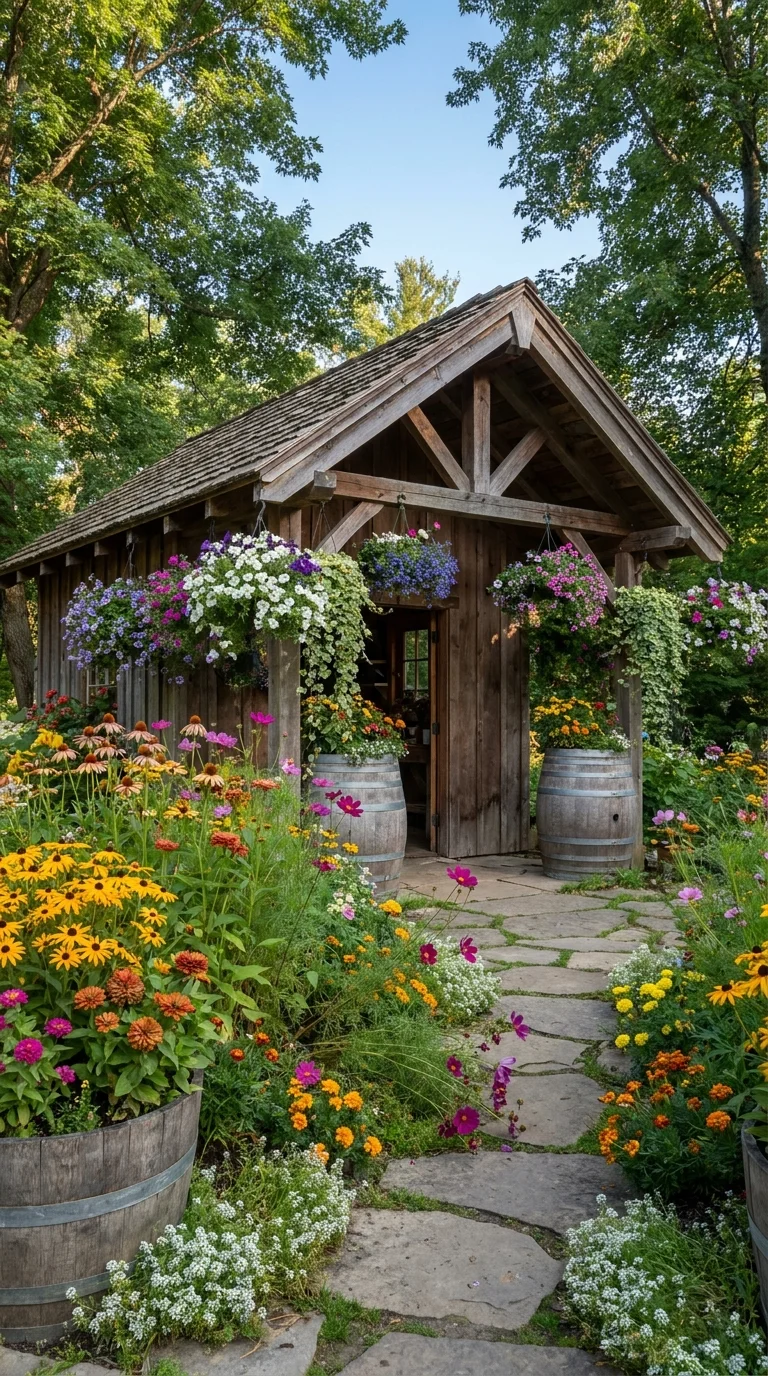
This timber-gabled shed uses a different design logic than any of the plant-heavy spaces before it: three matching hanging baskets flank each side of the open doorway, half wine-barrel planters line the path, and a dense coneflower-and-zinnia border fills in around the base. The whole effect comes from symmetry and repetition at a single focal point — the doorway — rather than from any one standout plant or structure.
It’s the right move for anyone with a plain existing shed who wants maximum bloom impact without permanent construction, and it rewards gardeners who genuinely enjoy daily watering and deadheading as a ritual rather than a chore. Because nothing here is built-in, it also pairs naturally with the kind of seasonal refresh covered in these backyard patio ideas built for an easy seasonal reset. The real cost is attention: hanging baskets droop fast after even one hot, neglected day, and true symmetry means buying and maintaining matched pairs rather than single statement pots. A lighter version keeps just one basket per side and drops the barrel planters, leaning on the ground border alone.
Why Three Matching Baskets Beat One Statement Pot
Even spacing and identical baskets on each side of the door are what make this read as designed rather than decorated after the fact — the eye registers the pattern instantly. Swap in baskets of different heights or styles on either side, and that instant symmetry disappears, replaced by something that looks unfinished instead of intentional.
Recommended Materials: cedar-toned timber frame, hanging wire baskets, half wine barrels, mixed annuals (petunia, million bells) and perennials (coneflower, black-eyed Susan, zinnia)
Main Colors: Warm Cedar Brown, Sunny Yellow and Orange, Magenta Pink, Fresh Green
Best Lighting: Consistent bright light is essential for both the hanging baskets and the ground border to bloom fully
Watering and Deadheading Routine: Hanging baskets in particular need frequent, sometimes daily, watering in hot stretches, plus regular deadheading and eventual liner replacement.
Small Mistakes That Undo the Symmetry
- Hanging baskets at uneven heights on each side, which breaks the pattern the whole entrance depends on
- Choosing especially thirsty basket plants with no real watering plan for hot weather
- Letting the ground border grow taller than the barrel planters, hiding them completely
- Mixing different pot or basket styles on each side, undercutting the intentional pairing.
Where the Front Border Is Also Dinner
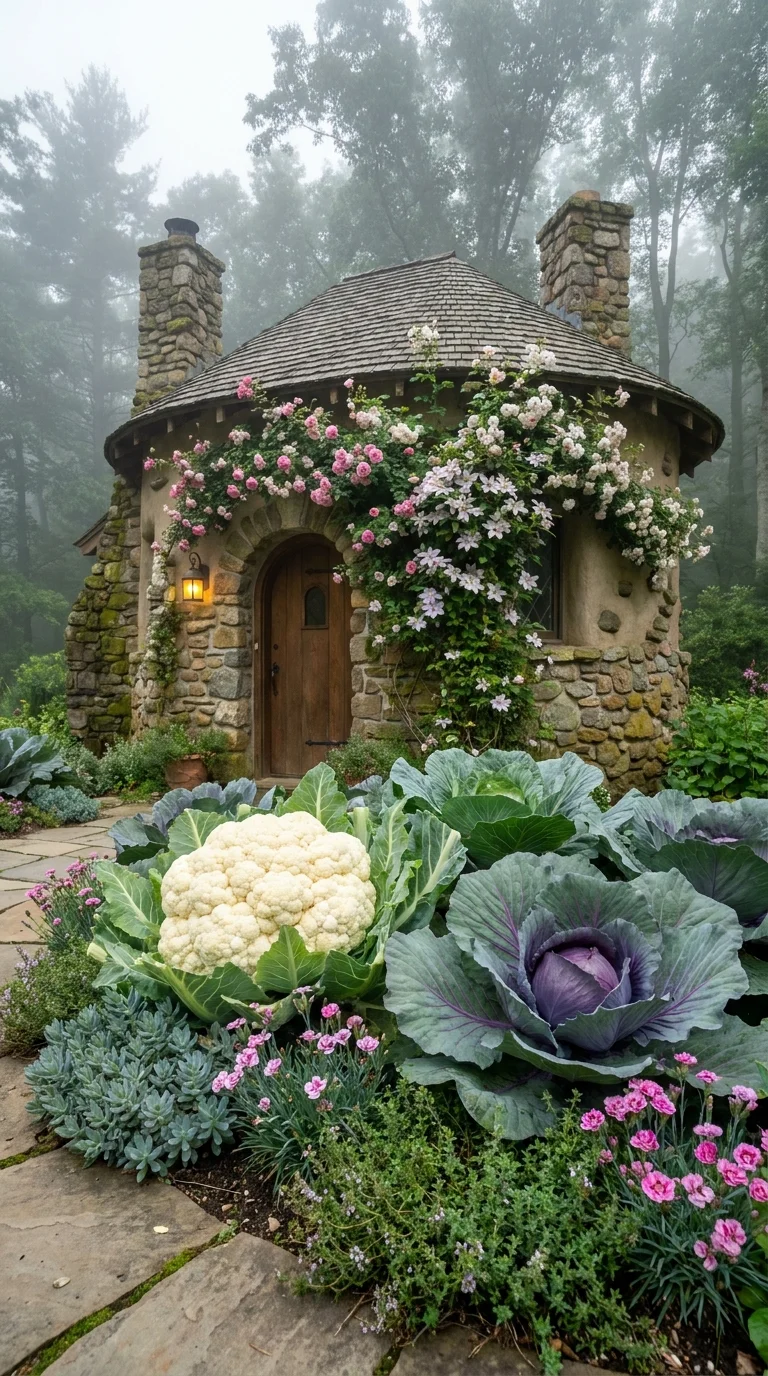
A round fieldstone cottage with a conical roof sits behind a front border planted not with flowers alone but with cauliflower, purple cabbage, succulents, and dianthus, styled with the same intention as any ornamental bed. It’s the only space in this list that blurs kitchen garden and cottage garden completely — the vegetables aren’t hidden in a back plot; they’re the star of the view from the front door.
This suits gardeners who want a genuinely productive yard without sacrificing curb appeal, especially on smaller lots where a separate hidden vegetable patch isn’t really an option. The trade-off is that vegetables have a shorter, messier decline than perennials once harvested, the border’s appearance shifts noticeably with each rotation, and pest pressure on brassicas is a real concern this close to a home entrance. Planting brassicas in odd-numbered clusters rather than straight rows keeps the bed reading as a garden border instead of a vegetable plot — that single layout choice does more than almost anything else to preserve the ornamental feeling.
Why Cool, Foggy Weather Suits This Pairing Best
Cauliflower and cabbage hold their sculptural form and color far longer in cool, overcast conditions like the ones shown here than they do once summer heat sets in, when they tend to bolt or lose that tight, ornamental shape. That’s part of why this particular look tends to photograph — and grow — best in shoulder-season weather rather than peak summer.
Recommended Materials: fieldstone cottage walls, wood-shingled conical roof, ornamental cabbage and cauliflower, succulents, dianthus, climbing roses and clematis
Main Colors: Silvery Blue-Green (cabbage), Creamy White (cauliflower), Dusty Pink (dianthus and roses), Weathered Stone Gray
Best Lighting: cool, diffused light suits the blue-green brassica tones best; harsh midday sun fades that color faster
Crop and Pest Upkeep: monitor for cabbage worms and other brassica pests, and plan for seasonal replanting once the vegetables are harvested.
Where This Idea Can Go Wrong
- Planting brassicas in tidy rows, which reads as a vegetable plot instead of a garden border
- Skipping pest netting this close to the entrance, inviting visible cabbage-worm damage
- Choosing vegetable varieties bred purely for yield over ones with strong color and form, like purple cabbage
- Letting the climbing rose or clematis on the cottage compete with the bold foliage below instead of framing it
Keeping This Garden’s Charm Intact Through Every Season
- Choose outdoor-rated fabrics for any cushions or seating textiles, and store or cover them before heavy rain
- Seal exposed wood — shed doors, barrel planters, log features — on a yearly schedule to prevent rot and splitting
- Route roof and gutter drainage away from stone walls and living roofs to prevent moss buildup and foundation damage
- Match plant choices to your actual hardiness zone rather than copying a photo’s palette exactly, since most of this look leans on perennials that need to survive a real winter
Who Should Choose This Style?
- Best for gardeners who enjoy hands-on, ongoing maintenance rather than low-touch landscaping
- Best for homes with existing stone, wood, or cottage-style architecture to build on
- Best for anyone who wants a garden that feels different from a neat, symmetrical modern yard
- Not ideal for renters or minimal-maintenance households, since most of this style’s charm depends on plants that need regular, consistent care
Budget Summary
| Budget | Expectation |
|---|---|
| Low | Mulch paths, budget garden figures, annual seed mixes, secondhand containers |
| Medium | Cedar shingle accents, wine barrel planters, hanging basket systems, established perennial borders |
| Premium | Custom curved-shingle roofing, copper greenhouse detailing, structural living roof installation, professional stonework |
Frequently Asked Questions
What plants are essential for a cottagecore garden look? Layered, slightly informal plantings do the most work — think climbing roses and clematis, cottage perennials like coneflower and black-eyed Susan, soft groundcovers like thyme and moss, and even ornamental vegetables like purple cabbage mixed into the border rather than hidden away.
Can I create a cottagecore garden in a small yard or on a budget? Yes — a single feature done well, like one hanging basket pair by a doorway or one half-barrel planter, captures the feeling without needing a full landscape redesign or a large budget.
Is a living roof difficult to maintain? It needs more planning upfront (waterproofing, root barriers, weight limits) than a typical planted bed, but ongoing maintenance is manageable if the plant selection stays shallow-rooted and drought-tolerant, like sedum.
How do I keep hanging baskets and outdoor cushions looking fresh? Water hanging baskets frequently in hot weather, deadhead regularly, and choose genuinely weather-resistant fabric for any cushions, bringing them in or covering them before extended rain.
Can edible plants like cabbage really work in an ornamental garden? Yes, especially varieties chosen for color and form rather than yield alone — planting them in clusters rather than straight rows keeps the bed reading as a border instead of a vegetable patch.
Aesthetic Life Team: The Aesthetic Life Team covers home and garden design with a focus on real, achievable ideas — breaking down what actually makes a space work, room by room and yard by yard, for readers planning their own.
Conclusion
The through-line across all ten of these spaces isn’t any single plant, material, or color — it’s commitment. A gnome village that’s actually built into stone, a roof that’s genuinely planted, vegetables treated with the same care as flowers: each one takes one storybook idea and follows it all the way through, instead of sprinkling a little whimsy over an otherwise ordinary yard. That’s the real lesson to borrow, whatever piece of this look ends up in your own garden.
Explore More
You may also enjoy: – Inside 10 Apartment Deck Designs: A Closer Look at What Works – The Above-Ground Pool – Rattan and Light: 10 Boho Sunroom Looks Worth Copying.
5 Responses