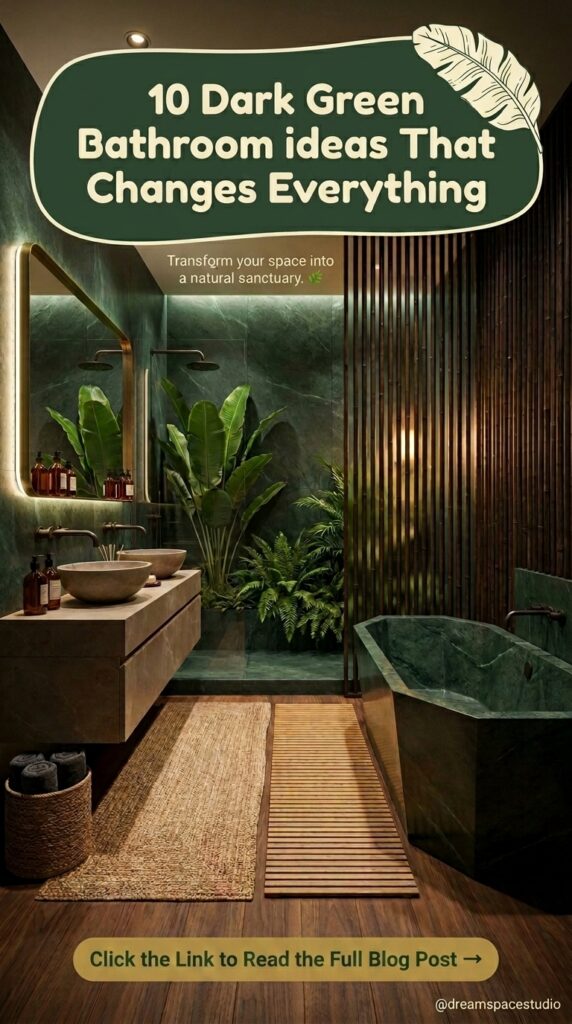
Dark green has become the go-to color for anyone who wants their bathroom to feel like a hotel spa instead of a utility room, but “dark green bathroom” can mean ten genuinely different rooms — a glossy zellige-tiled wet room, a matte plaster cave, an ornate gold-trimmed powder room. Each one solves a different problem and asks something different of the space you actually have.
This guide walks through ten real dark green bathrooms, each built around one clear design decision, so you can see exactly why each one works — not just that it looks good — and figure out which direction actually fits your layout, your lighting, and how much upkeep you’re willing to take on.
Quick Overview
| Style | Dark Green / Moody Botanical |
|---|---|
| Best For | Primary bathrooms, powder rooms, spa-style renovations |
| Budget | Medium–High |
| Difficulty | Moderate (tiling and plumbing involved) |
| Maintenance Level | Medium |
1. The Glossy Zellige Bathroom Where the Tub Water Glows Gold
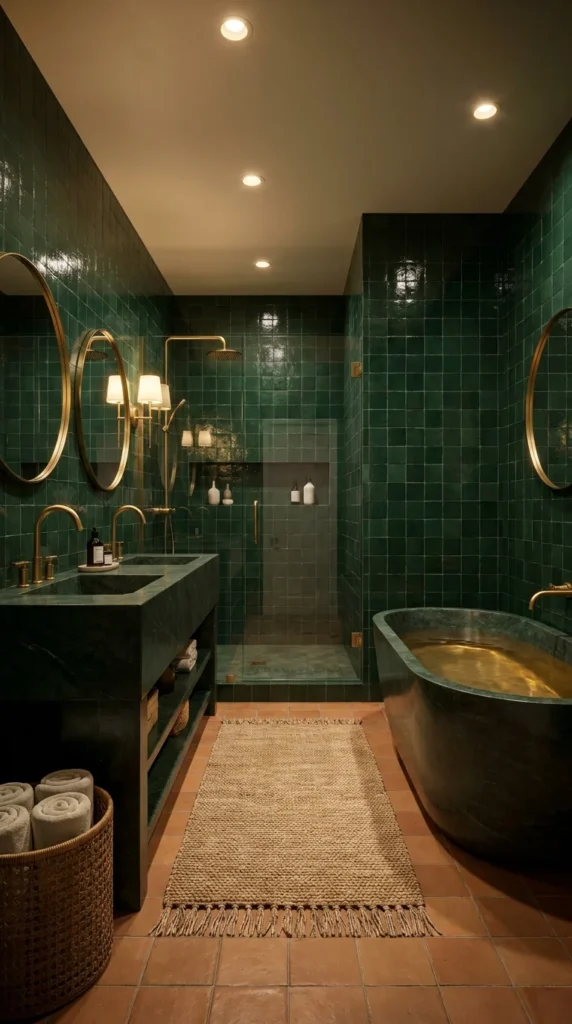
The defining decision in this room isn’t the tile — it’s the brass-lined soaking tub, which turns the bathwater itself into a warm gold glow against glossy emerald zellige walls. That’s a specific material choice, not a lighting trick: brass or brass-effect tub interiors reflect ambient light back up through the water in a way a standard enameled tub never will.
This suits primary bathrooms with a genuine soaking tub as the centerpiece, not a small shower-only room where the effect would be lost. It’s a strong fit for anyone renovating a full bathroom from scratch, since the handmade-look zellige tile, terracotta hex flooring, and stone dual vanity all need to be specified together to read as intentional rather than mismatched.
The advantage is how much warmth the room holds onto despite such a dark, saturated tile color — the terracotta floor and brass fixtures keep it from feeling cold. The compromise is glare management: glossy zellige reflects overhead lighting directly, so recessed lighting needs to be angled or dimmed rather than aimed straight at the tile.
To simplify this on a smaller budget, a standard white or stone tub with brass-finish fixtures gets close to the same warmth without the cost of a lined tub. Keep the terracotta floor and jute bath mat — they’re doing more of the room’s warmth than people usually assume.
💡 Quick Tip: Dim recessed lighting to around 30–40% brightness in a room with glossy tile this dark — full brightness creates hot spots that flatten the tile’s handmade texture.
If tile color is the decision you’re actually stuck on, our bathroom colors guide breaks down how emerald compares to several other statement palettes side by side.
Where This Look Gets People Into Trouble
- Pairing glossy zellige with cool-white LED bulbs, which strips the tile of its warm handmade character
- Skipping a bath mat, leaving nothing to break up the terracotta floor’s continuous pattern
- Choosing a chrome tub filler instead of brass, breaking the room’s single metal-finish rule
- Overcrowding the vanity counter, which competes with the sculptural weight of the stone sink
Recommended Materials: Glossy zellige tile, brass fixtures, stone vanity slab, terracotta hex flooring, jute rug, rattan storage baskets
Main Colors: Emerald Green, Warm Brass, Terracotta, Ivory
Best Lighting: Recessed ceiling lights dimmed low, plus wall sconces flanking the mirrors at eye level so the light doesn’t bounce straight off the glossy tile.
Maintenance: Zellige tile is porous and needs periodic resealing; brass fixtures will patina naturally over time unless lacquered, which is worth deciding on before installation, not after.
2. The Plaster Cave Bathroom Built Around One Round Window
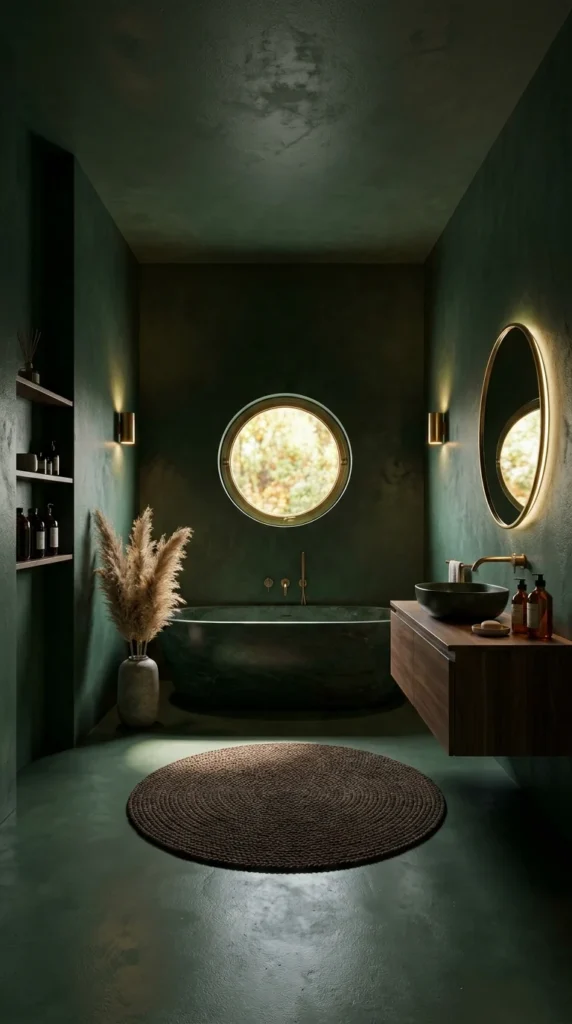
Nearly every surface in this bathroom — walls, ceiling, floor — shares the same dark textured plaster, and the single decision that keeps it from feeling like an empty void is the round porthole window positioned directly behind the tub. Light enters through one deliberate opening instead of a standard rectangular window, and that single circular source becomes the room’s real focal point.
This works in bathrooms without much natural light to begin with, since a monolithic dark plaster envelope actually depends less on daylight than a pale room would — the backlit mirror and wall sconces are doing the functional lighting work, while the window is there for mood and a glimpse of greenery outside.
Anyone who wants their bathroom to feel like a retreat rather than a utility space should look closely at this room. It’s a poor fit for a small powder room used constantly through the day, since the low, moody lighting reads as evening-appropriate rather than practical for quick daytime use.
Would this design work for me? If your bathroom has at least one architectural opportunity — an odd window shape, a niche, an unusual wall angle — this approach shows how to build the entire room around that one feature instead of working around it.
To recreate this on a smaller budget, a limewash or textured paint finish gets close to real plaster’s depth at a fraction of the material and labor cost, and a single backlit mirror can substitute for the window as the room’s light anchor if a round window isn’t structurally possible.
🌙 Quick Tip: Textured plaster finishes read best under warm, low-angle light — avoid pointing any fixture directly at the wall, which flattens the texture instead of highlighting it.
Easy Ways to Get This Wrong
- Using a smooth paint finish instead of a textured one, losing the depth the plaster look depends on
- Adding too many small decorative objects, which breaks the room’s deliberate emptiness
- Choosing cool-white sconces, which clash with the warmth the backlit mirror is meant to provide
- Skipping ventilation planning — dark plaster in a poorly ventilated room shows water staining faster than tile would
Recommended Materials: Textured lime plaster, stone soaking tub, backlit oval mirror, brass sconces, jute round rug, dried pampas grass
Main Colors: Deep Moss Green, Charcoal, Warm Brass, Natural Stone
Best Lighting: A backlit mirror and two brass wall sconces supply nearly all the artificial light; the round window is positioned to catch late-day sun directly over the tub.
Maintenance: Lime plaster is more moisture-sensitive than tile — it needs a breathable sealant and steady bathroom ventilation to avoid staining near the tub and shower area.
3. The Tile Bathroom Where Trailing Plants Do the Real Decorating
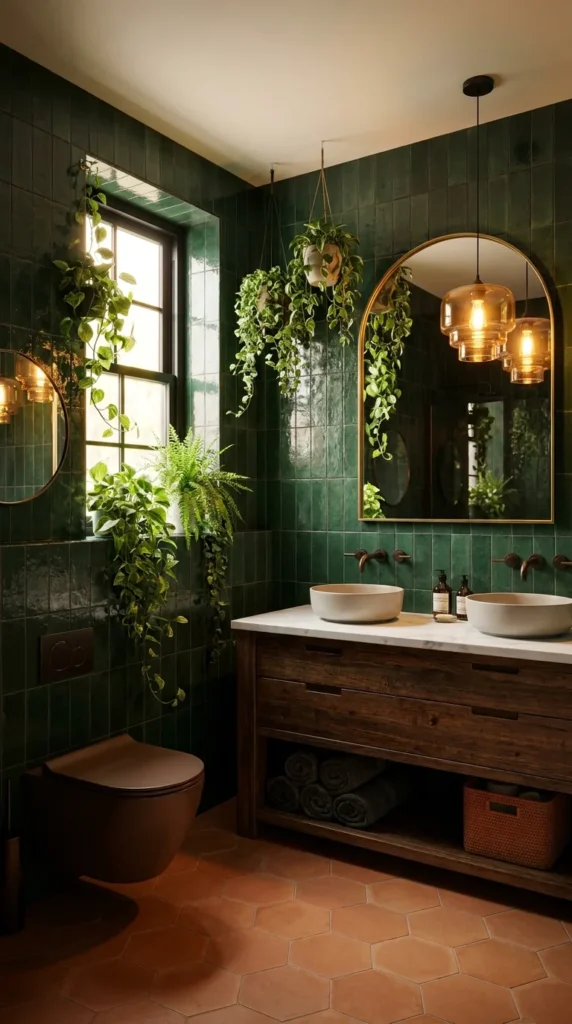
Glossy green zellige and terracotta hex flooring appear again here, but the defining move in this room is different: hanging pothos and ferns cascade directly over the tile and mirror, turning static wall surfaces into something that moves and grows. This isn’t a shelf of plants set to the side — the greenery is placed to interact with the architecture itself.
This suits bathrooms with a genuine window for the plants to actually thrive near, since trailing pothos and ferns both need real light, not just decorative placement. It’s an excellent fit for anyone who already gardens indoors and wants that hobby integrated into the bathroom rather than confined to a windowsill elsewhere in the house.
The advantage is how alive and layered the room feels compared to a tile-only version of the same palette — the plants add visual movement no fixed material can. The compromise is real maintenance: trailing plants in a humid bathroom need regular pruning, occasional repotting, and enough light, which is a meaningfully bigger commitment than a faux version.
To simplify this for a lower-maintenance version, one or two hanging pots near the window rather than a full cascading arrangement still brings life into the room without demanding as much upkeep. Faux trailing greenery is a reasonable substitute directly above a shower or tub, where humidity and light are hardest to balance for a real plant.
🌿 Quick Tip: Pothos and ferns tolerate bathroom humidity well, but both still need indirect natural light — a north-facing window with no direct sun is close to ideal.
For more on integrating real plant life into a room’s structure rather than just adding pots, our biophilic living room guide covers the same principle applied to a different room type.
Common Mistakes With a Plant-Heavy Bathroom
- Choosing plants that need bright direct light for a bathroom that only gets indirect sun
- Overwatering, since bathroom humidity already supplies more moisture than these plants need from the soil
- Hanging pots directly in the shower’s water path, leading to root rot from repeated soaking
- Skipping drainage trays, allowing water to stain the zellige grout underneath hanging planters
Recommended Materials: Glossy zellige tile, terracotta hex flooring, brass fixtures, reclaimed wood vanity, marble countertop
Main Colors: Forest Green, Terracotta, Warm Brass, Leaf Green (plants)
Best Lighting: A cluster of amber glass pendants adds warm ambient light near the mirror; the window supplies the indirect daylight the plants actually depend on.
Maintenance: Trailing plants need pruning every few weeks to prevent overgrowth into the shower area, along with monthly feeding during growing season and repotting roughly every one to two years.
4. The Spa Bathroom Anchored by a Carved Wood Monstera Leaf
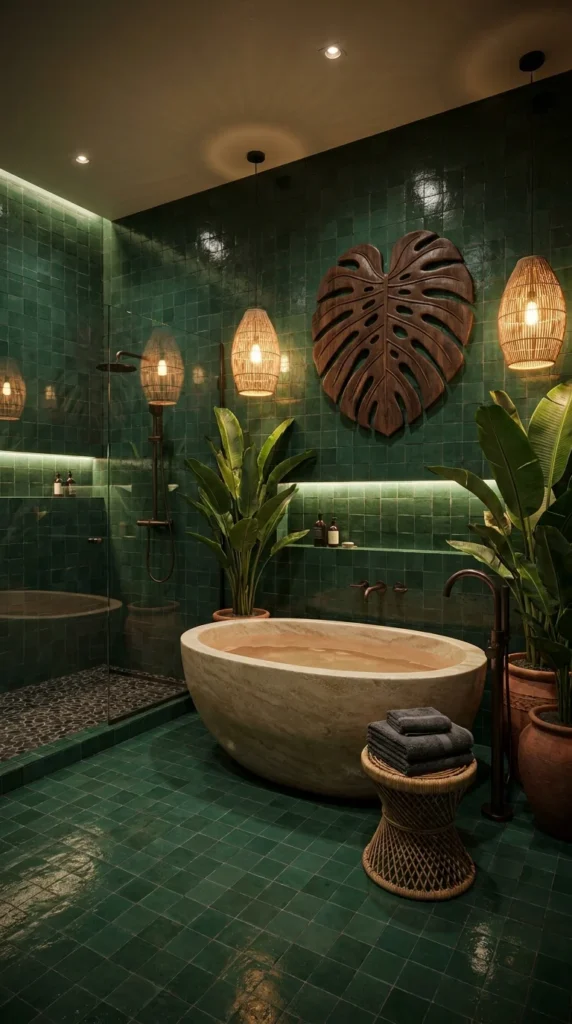
A hand-carved wood monstera leaf, mounted at a scale that would look oversized anywhere else, is the reason this room reads as a boutique hotel spa rather than a home bathroom. It sits directly above a massive travertine oval tub, and the two pieces are clearly meant to be seen together — sculptural stone below, sculptural wood above.
This is best suited to a primary bathroom with real square footage, since both the tub and the wall art need distance to be appreciated rather than crowding a smaller room. It’s the right choice for someone who wants one unmistakable statement piece rather than many smaller decorative choices, and it works especially well for households drawn to resort-style, botanical design language.
Is the Carved Wall Art Worth the Investment?
A piece this size and detail — hand-carved, not printed or molded — is a genuine investment, and it’s worth it specifically in a room built to showcase it, the way this one is. The travertine tub, rattan pendant lighting, and layered live plants are all working to support that one wall as the room’s focal point; without a room built around it, the same carved piece would compete with everything else rather than anchoring it. If your bathroom doesn’t have a clear, uncluttered wall for a piece this scale, the investment doesn’t pay off the same way — a smaller carved detail or a botanical print delivers a similar idea at a fraction of the cost and commitment.
The tradeoff of this whole approach is scale-dependency — nearly everything in the room, from the tub to the wall art, is oversized, which makes it a poor fit for a modest-sized bathroom no matter how much the look is admired.
To adapt the idea at a smaller scale, a single smaller carved wood panel or botanical relief tile can deliver the same “sculptural nature” concept without requiring a tub this large to balance it.
🌴 Quick Tip: Oversized wall art needs at least 8–10 inches of clear wall space on all sides to read as intentional rather than crowded.
Where This Room Falls Apart at a Smaller Scale
- Attempting the same size wall art in a standard-sized bathroom, where it overwhelms rather than anchors
- Choosing a printed or molded reproduction instead of genuine carved texture, which reads flat under the room’s warm lighting
- Skipping the rattan pendant lighting in favor of recessed-only lighting, losing the warm glow the carving depends on
- Placing live plants too close to the stone tub, creating a maintenance and cleaning conflict around the tub’s edge
Recommended Materials: Glossy zellige tile, hand-carved wood wall art, travertine stone tub, rattan pendant shades, bronze fixtures
Main Colors: Deep Forest Green, Warm Travertine, Bronze, Leaf Green
Best Lighting: Rattan pendant lights positioned to cast warm shadow patterns across the carved wood; avoid direct overhead lighting on the art itself, which flattens its dimensional carving.
Maintenance: Travertine stone needs periodic sealing to resist water staining; the wood carving should stay away from direct steam exposure from the shower to prevent warping over time.
5. The Zoned Bathroom Where a Wood Slat Wall Splits Wet From Dry
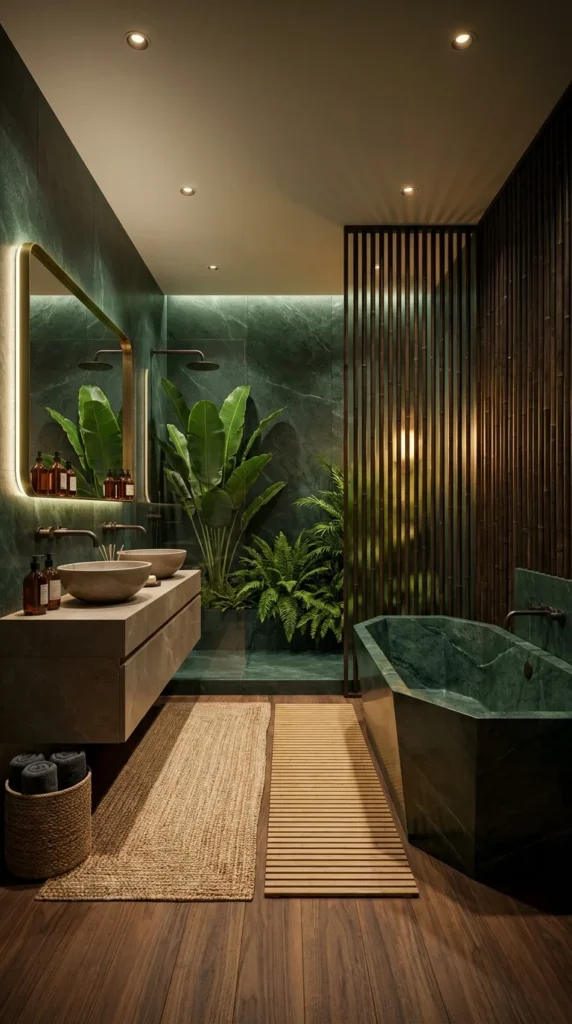
Instead of tile or glass separating the shower from the vanity area, this room uses a vertical wood slat partition to divide wet and dry zones — a functional decision that doubles as the room’s main design statement. Stone slab walls, a green stone tub, and a wood-plank floor all stay consistent on both sides, so the slats read as a deliberate architectural moment rather than a change in materials.
This suits larger bathrooms being laid out from scratch, where the zoning decision can be made early rather than retrofitted. It’s a strong option for households sharing one bathroom, since separating wet and dry zones this clearly lets one person shower while another uses the vanity without splashing concerns.
The clearest advantage is functional: the slats let steam and light pass through while still creating a visual and physical boundary, which a solid wall wouldn’t achieve. The compromise is that partial partitions like this don’t fully contain water the way a glass enclosure would, so floor slope and drainage need to be planned carefully underneath.
To simplify this for a smaller bathroom, a single narrow slat panel used purely as a decorative backdrop behind the tub — without the full room-dividing function — still brings in the material and texture without needing the extra floor space a full partition requires.
🪵 Quick Tip: Space wood slats roughly 1–2 inches apart for a partition — tighter spacing blocks too much light between zones, wider spacing loses the privacy screening effect.
Common Mistakes With a Wood Slat Partition
- Using non-water-resistant wood species, which warp and discolor faster in a humid bathroom environment
- Spacing the slats too tightly, cutting off light transfer between the wet and dry zones
- Skipping proper floor drainage on the shower side, since a slat wall doesn’t fully contain water the way glass does
- Mixing more than two stone finishes in one room, competing with the slats for visual attention
Recommended Materials: Water-resistant wood slats, green stone slab walls, wood-look tile flooring, stone vessel sinks, bronze fixtures
Main Colors: Deep Forest Green, Warm Teak, Bronze, Stone Grey
Best Lighting: A backlit mirror above the vanity supplies the primary task lighting; recessed ceiling lights on the shower side stay warm-toned to match the wood tones throughout.
Maintenance: Wood slats in a wet zone need a marine-grade sealant reapplied roughly annually; stone slab walls should be resealed on the same schedule as the tub to prevent water absorption.
Related Guides
- 10 Moody Bathroom Ideas That Feel Luxurious, Not Dark — for balancing a dark palette so the room still feels bright enough to use daily
- Earthy Bathroom Design Ideas — a close companion palette to several of the terracotta-and-green rooms above
- 9 Sconce Placements That Change How a Bathroom Feels — useful if the lighting notes in this guide left you wanting more detail on fixture placement
- 10 Bathroom Colors That Turn a Plain Room Into a Statement Space — compares emerald against several other bold bathroom palettes
- 10 Ways to Upgrade Your Bathroom With the Right Vanity — a deeper dive into vanity choices for several of the layouts covered here
6. The Minimalist Matte Room That Skips Ornament Entirely
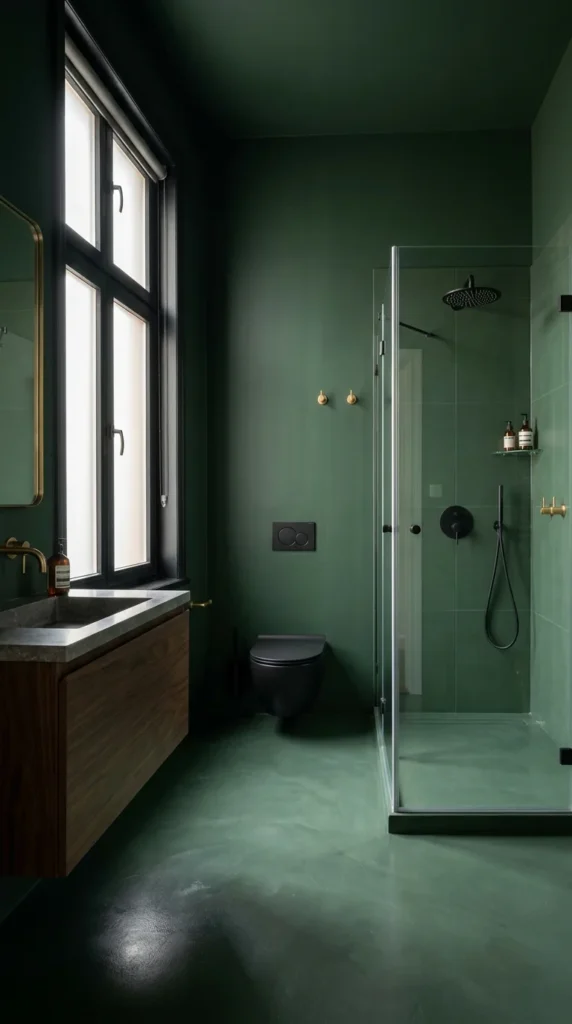
Where most of this list layers on tile texture, plants, or carved detail, this bathroom does the opposite: matte sage-green walls, polished concrete flooring, and all-black fixtures, with almost nothing else added. The restraint itself is the design decision, and it works because every material chosen has a genuinely different finish — matte wall, glossy shower glass, honed concrete, satin black metal.
This suits smaller bathrooms where a busier palette would feel cramped, and it’s a strong fit for anyone renovating on a tighter timeline, since matte paint and concrete flooring are faster and cheaper to install correctly than tile work. It’s a weaker fit for anyone who wants their bathroom to feel warm and enveloping — this room reads calm and a little clinical by comparison to the tile-heavy rooms above it.
The advantage is how easy this palette is to maintain and eventually update — a matte paint color is far simpler to change than tile if your taste shifts. The compromise is that a room this pared-back depends entirely on getting the few material choices exactly right; a cheaper black fixture finish or an uneven concrete pour will show immediately with nothing else to distract from it.
To simplify this for a rental, painted walls in the same sage-green tone paired with black-finish hardware swaps (faucet, towel bar, light fixture) achieve most of the mood without touching the flooring at all.
⚫ Quick Tip: Matte black fixtures show water spots more visibly than chrome — a quick squeegee after each shower keeps them looking intentional rather than neglected.
If your bathroom is on the smaller side and this restrained approach appeals to you, our guide to small powder rooms doing more with less space covers several related minimalist strategies worth comparing.
Where a Minimalist Room Like This Falls Apart
- Mixing warm gold fixtures into an otherwise all-black hardware scheme, breaking the room’s one consistent metal
- Choosing a glossy paint finish instead of matte, which changes the entire mood of the wall color
- Leaving the concrete floor unsealed, leading to staining that’s difficult to reverse later
- Adding too many small decorative objects, undermining the intentional emptiness the room depends on
Recommended Materials: Matte plaster paint, polished concrete flooring, matte black fixtures, walnut floating vanity, glass shower enclosure
Main Colors: Sage Green, Charcoal, Matte Black, Warm Walnut
Best Lighting: The tall window supplies most of the daytime light; keep artificial lighting simple with one warm-toned wall sconce rather than multiple competing fixtures.
7. The Monochrome Plaster Retreat With a Freestanding Brass Tub
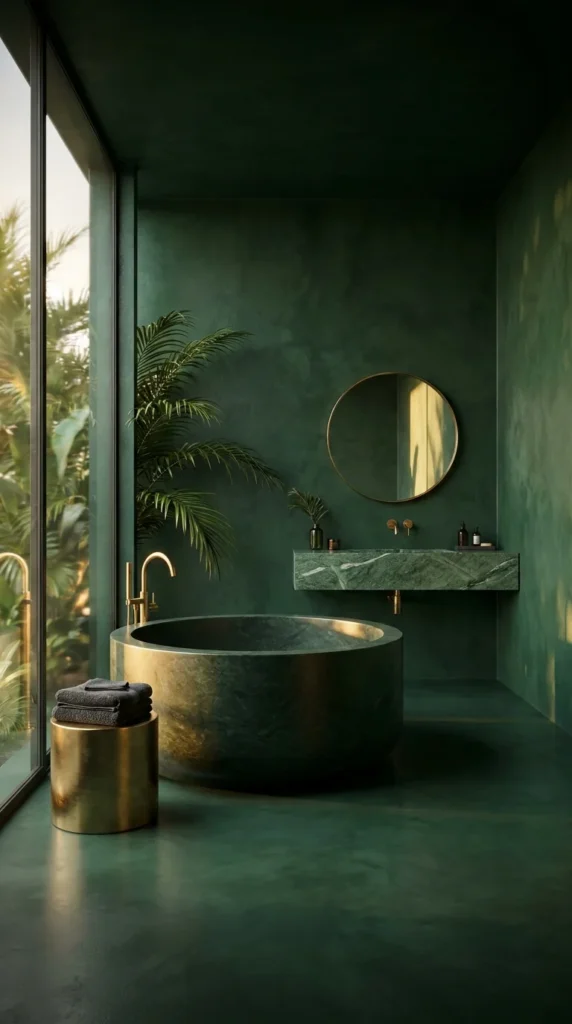
Walls, floor, and even the ceiling share one deep forest-green plaster tone in this room, and the freestanding stone-and-brass round tub is the only object allowed to break that monochrome envelope. A full wall of glass brings in palm fronds and daylight, which keeps a room this saturated from feeling closed in.
This works best in bathrooms with a genuine outdoor view worth showing off — without that glass wall doing the work of bringing the outside in, a fully monochrome green room risks feeling heavy rather than enveloping. It’s suited to warmer climates or well-insulated primary suites where floor-to-ceiling glass is a realistic option, less so for a bathroom with no natural light source at all.
The strongest advantage is how resolved and considered the room feels — one wall color, one tub shape, one material palette, nothing competing for attention. The tradeoff is that a monochrome room this committed requires real confidence in the paint or plaster color chosen; there’s no second material to fall back on if the green ends up reading wrong once painted.
To simplify this for a smaller budget, plaster-effect paint on just two walls with the rest kept in a lighter neutral still nods to the idea without committing an entire room’s surfaces to one saturated tone.
🛁 Quick Tip: Sample any monochrome wall color at both morning and evening light before committing — a color this saturated can shift dramatically between the two.
Common Mistakes With a Monochrome Green Room
- Painting all surfaces before testing the color against the room’s actual window light and orientation
- Adding a second bold accent color, which breaks the intentional single-tone envelope
- Choosing a smaller tub that gets visually lost against so much saturated wall space
- Skipping window treatments entirely, leaving no privacy option for a room with full glass
Recommended Materials: Textured plaster, brass and stone freestanding tub, round brass mirror, brass fixtures, potted palm
Main Colors: Deep Forest Green (single tone throughout), Warm Brass
Best Lighting: Full-height glass supplies most of the daylight; keep evening lighting to a single warm sconce near the mirror so the monochrome walls aren’t fighting multiple light sources.
Maintenance: The potted palm needs bright indirect light and regular watering; textured plaster near the glass wall should be checked periodically for condensation buildup if the room isn’t well ventilated.
8. The Living Moss Wall That Makes the Bathroom Feel Underground
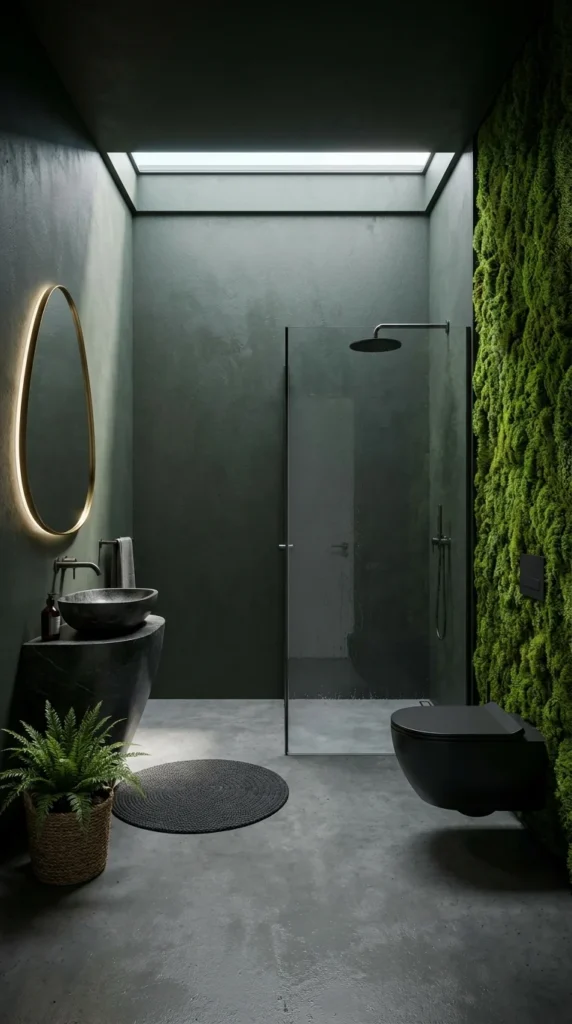
A full wall of preserved living moss, lit from a single overhead skylight, is the one decision that defines this room completely. Everything else — matte concrete-look walls, a black pedestal sink, a glass shower enclosure — stays quiet specifically so the moss wall can read as the room’s living, breathing centerpiece.
This suits bathrooms with either a skylight or strong overhead lighting already built in, since the moss wall depends on that single dramatic light source to read as intentional rather than simply dark. It’s an unusual, memorable choice best suited to a primary bathroom where the household genuinely wants a design risk, not a resale-neutral update.
The advantage is unmatched texture and sensory interest — no other material in this list adds sound-dampening softness and visible depth quite like a moss wall does. The compromise is that preserved moss needs a stable humidity range to maintain its texture and color; a bathroom with wildly fluctuating humidity (very hot showers, poor ventilation) can dry it out or cause mold growth over time.
To simplify this for a lower-commitment version, a smaller moss panel used as an accent behind the mirror rather than a full wall still introduces the texture without the same environmental risk across a larger surface.
🌱 Quick Tip: Preserved moss doesn’t need watering, but it does need stable humidity — avoid installing it directly in a shower’s steam path, where humidity swings are most extreme.
Where This Feature Wall Goes Wrong
- Installing preserved moss directly in the shower’s steam path, where humidity extremes shorten its lifespan
- Skipping the skylight or equivalent strong light source, leaving the moss wall too dark to read as a feature
- Choosing live (unpreserved) moss without researching the specific humidity and light needs it requires
- Cluttering the rest of the room with additional textures, which competes with the moss wall’s sensory impact
Recommended Materials: Preserved moss wall panel, matte plaster-look walls, polished concrete flooring, matte black fixtures, glass shower enclosure
Main Colors: Deep Moss Green, Charcoal, Matte Black, Warm Brass (mirror trim)
Best Lighting: A single skylight is the room’s defining light source; keep supplementary lighting minimal so it doesn’t compete with the natural light falling on the moss wall.
Maintenance: Preserved moss needs no watering but should be dusted occasionally and kept away from direct water spray; check the humidity level periodically if the bathroom lacks strong ventilation.
9. The Ornate Paneled Bathroom Built Around a Crystal Chandelier
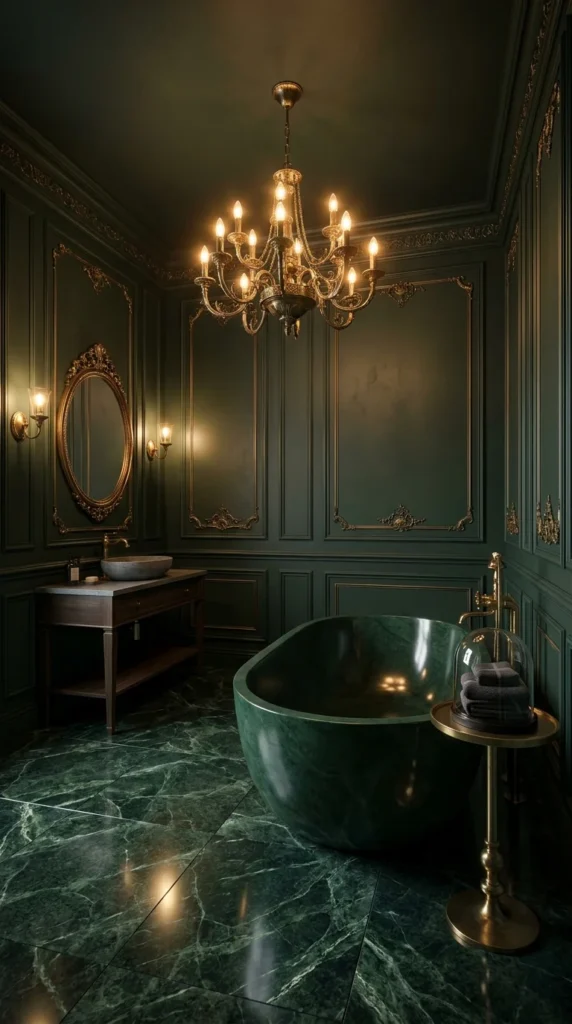
This is the most formal room in the group, and its defining choice is unapologetic: carved gold-trimmed wall paneling and a full crystal chandelier, paired with a polished dark green marble floor. Nothing here is trying to look understated — it’s a maximalist, vintage-glam interpretation of dark green rather than a natural or botanical one.
This suits primary bathrooms in homes that already lean traditional or European in architectural style, where ornate millwork and a chandelier feel consistent with the rest of the house rather than out of place. It’s a poor fit for a modern or minimalist home, where this level of ornamentation would clash rather than complement.
The advantage is unmistakable drama — few other approaches on this list photograph or feel as immediately luxurious. The compromise is scale and cost: carved paneling, a full chandelier, and slab marble flooring are a significant investment compared to tile and paint, and the formality doesn’t suit every household’s daily use of a bathroom.
To simplify this for a smaller budget, a single ornate mirror and one statement pendant light (rather than a full chandelier) can bring in some of the same formality without the paneling’s cost, paired with a more affordable marble-look porcelain tile instead of slab stone.
✨ Quick Tip: A chandelier over a bathtub needs to be rated for damp locations — check the fixture’s listing before installation, not after.
Rooms with this much period detail have real crossover with retro styling — our retro bathroom trends roundup covers several related vintage-leaning approaches worth comparing against this one.
Common Mistakes With Ornate Millwork Like This
- Installing a standard chandelier not rated for bathroom humidity, which is both a safety and a longevity issue
- Mixing gold trim with a second competing metal finish elsewhere in the room
- Choosing porcelain tile with an obviously fake-looking marble pattern instead of a higher-quality reproduction
- Overcrowding the vanity with small objects, which undercuts the room’s formal, uncluttered elegance
Recommended Materials: Carved wood paneling, gold leaf trim, polished dark green marble, crystal chandelier, brass sconces
Main Colors: Deep Green, Antique Gold, Polished Marble, Ivory
Best Lighting: The crystal chandelier is the room’s primary light source; brass wall sconces flanking the mirror add task lighting without competing with the chandelier’s presence.
Maintenance: Polished marble needs regular sealing to resist water and soap staining; carved wood paneling should stay away from direct steam exposure to prevent the wood from swelling over time.
10. The Boho Powder Room Where Rattan Furniture Softens Every Hard Edge
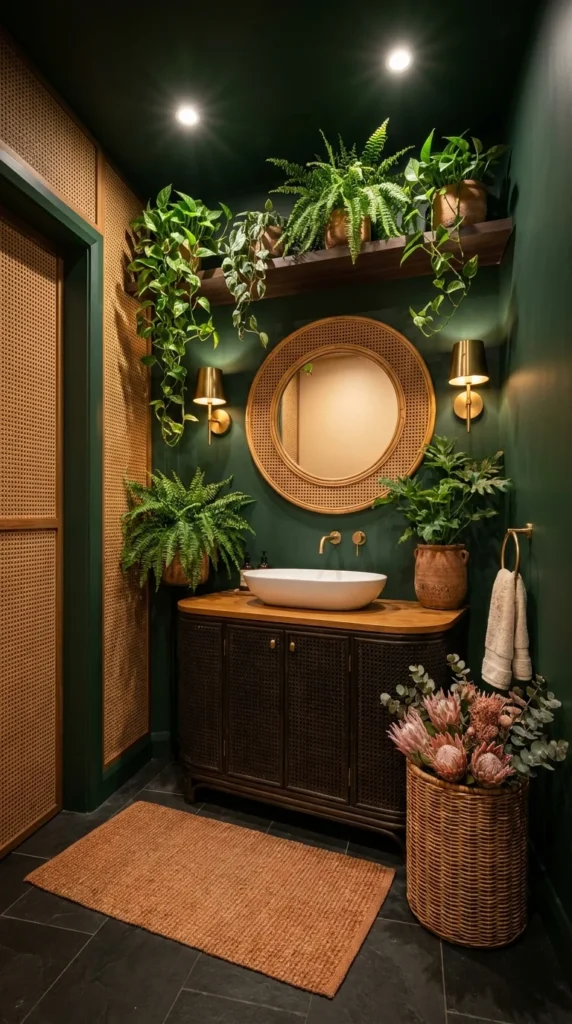
Dark green walls form the backdrop, but the real decision here is material: rattan and cane furniture — a round cane-framed mirror, a woven vanity cabinet — paired with an overflowing wall shelf of trailing plants. Nothing in the room is glossy or hard-edged; every texture is soft, woven, or organic.
This suits a smaller powder room or guest bathroom rather than a primary suite, since the scale of a single vanity wall is exactly what this composition is built around. It’s an excellent fit for renters or anyone wanting a lower-commitment update, since cane furniture and a plant shelf can be added to an existing green-painted wall without any structural or tile work at all.
The advantage is warmth and approachability — this is the least formal, most immediately livable room in the entire list, and it costs meaningfully less to achieve than the tile- or stone-heavy rooms above it. The compromise is durability: rattan and cane are more delicate in a humid bathroom environment than tile, stone, or sealed wood, and they’ll show wear faster in a heavily used space.
To simplify this even further, a single rattan-framed mirror against a painted dark green wall captures most of the room’s personality without needing the matching cane vanity cabinet as well.
🧺 Quick Tip: Choose cane furniture specifically rated or treated for high-humidity use in a bathroom — standard indoor rattan can warp or mildew faster than expected near a sink.
Where a Rattan-Heavy Room Falls Apart
- Using untreated rattan or cane in a poorly ventilated bathroom, leading to premature warping or mildew
- Overloading the plant shelf without checking weight limits, risking sagging or wall damage over time
- Skipping a rug entirely, leaving the floor feeling unfinished against so much textural warmth above it
- Choosing a cool-toned green paint instead of a warm forest tone, clashing with the rattan’s natural warmth
Recommended Materials: Cane and rattan furniture, painted plaster walls, terracotta jute rug, wood countertop, brass fixtures
Main Colors: Deep Forest Green, Natural Rattan, Terracotta, Leaf Green (plants)
Best Lighting: Two brass wall sconces flank the round mirror for warm, even task lighting; recessed ceiling lights stay minimal so the rattan textures read clearly rather than washing out.
Maintenance: Rattan and cane furniture should be wiped dry after use and kept away from direct water splash; the plant shelf needs regular watering and occasional pruning to prevent overgrowth crowding the mirror.
Cleaning & Moisture Tips for a Dark Green Bathroom
- Squeegee glass shower enclosures and glossy tile after every use — dark, glossy surfaces show water spots and soap scum faster than lighter, matte ones
- Reseal natural stone (tubs, slab walls, marble flooring) on a consistent annual schedule, since a dark, saturated stone hides early staining until it’s already set in
- Run a fan or crack a window for at least 20 minutes after every shower in rooms with plaster, wood, or living plant features, all of which are more humidity-sensitive than standard tile
- Wipe down brass or matte black fixtures with a soft cloth regularly — both finishes show fingerprints and water spots more visibly than chrome
Who Should Choose This Style?
- Best for homeowners renovating a primary bathroom who want a genuine spa-hotel feeling at home
- Best for bathrooms with a window, skylight, or other real light source, since dark saturated color depends on light management to avoid feeling like a cave
- Best for plant lovers who don’t mind the upkeep that comes with humidity-loving greenery
- Not ideal for a small, windowless powder room without supplemental lighting already planned in
Budget Summary
| Budget | Expectation |
|---|---|
| Low | Peel-and-stick green tile, brass-look hardware, a jute bath mat, a single rattan-framed mirror |
| Medium | Zellige-style tile, dual vessel sinks, brass or matte black wall sconces, a stone-look vanity top |
| Premium | Full slab stone tub, custom wood paneling or carved wall art, a damp-rated chandelier, integrated living moss or plant walls |
FAQ
Does dark green make a small bathroom feel smaller? It can, but glossy tile, a mirror sized to the wall, and at least one strong light source (a window, skylight, or backlit mirror) counteract most of that effect — several of the smaller rooms in this guide use exactly that combination.
What’s the difference between zellige tile and regular ceramic tile for a green bathroom? Zellige is handmade, so each tile has slight color and surface variation that catches light differently than a uniform ceramic tile. It costs more and needs more careful sealing, but it’s the main reason several rooms in this guide have visible depth rather than a flat green surface.
Can I do a dark green bathroom without tile, using just paint? Yes — several rooms above rely primarily on plaster or matte paint rather than tile, which is a faster and less expensive way to test the color commitment before investing in tile work.
What plants survive best in a humid dark bathroom? Pothos, ferns, and snake plants all tolerate bathroom humidity well and don’t need direct sun, making them realistic choices for a room with only indirect natural light.
Is a fully dark bathroom hard to resell? It can narrow buyer appeal compared to an all-white bathroom, though a well-executed dark green room with good lighting photographs strongly and is increasingly common enough in higher-end listings that it’s less of a liability than it once was.
About the Author
This guide was researched and written by the Aesthetic Lifes editorial team, who cover bathroom and spa-style interior design with a focus on ideas readers can realistically source, tile, and light in their own homes.
Conclusion
Dark green bathrooms range from a five-minute paint update to a full stone-and-chandelier renovation, and this guide walked through ten genuinely different ways to land somewhere on that spectrum. Whether you’re drawn to the quiet restraint of the matte concrete room or the full drama of the chandelier and marble, the common thread across all ten is the same: dark green only works when the room’s lighting is planned as carefully as its color. Start with whichever room made you want to actually stop and picture it in your own bathroom — that’s the clearest signal for where to begin.
Explore More
You may also enjoy:
- The Japandi Bathroom Trend Explained: A Room-by-Room Look
- Retro Bathroom Trends Making a Stylish Comeback
- 10 Wall Mirror Ideas That Make Small Rooms Look Twice as Big
One Response