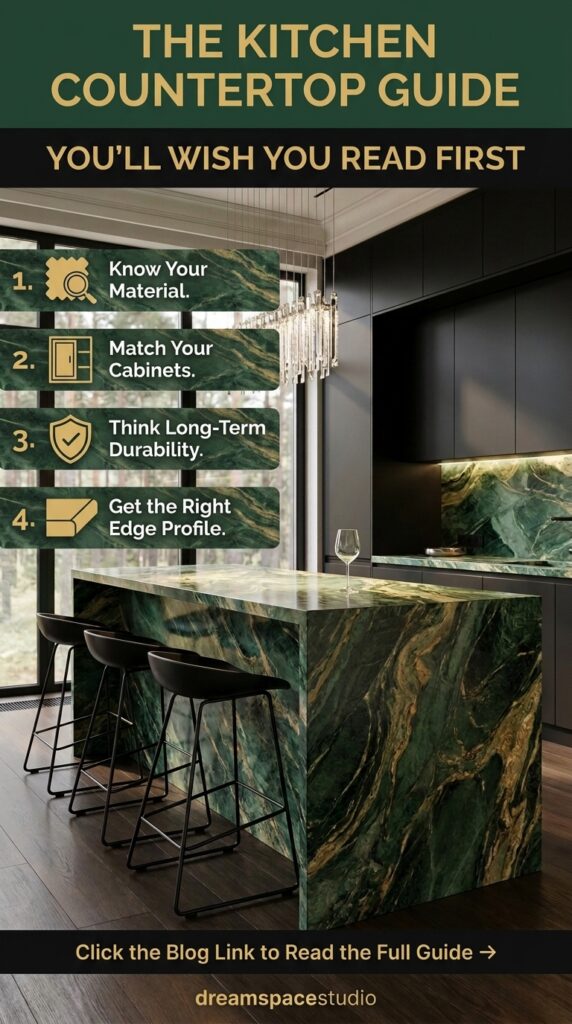
Standing in front of a slab yard with ten different stones and no idea which one survives a decade of daily cooking is where most kitchen renovations quietly go sideways. The countertop is the single most touched, most photographed, and most expensive-per-square-foot surface in the entire house—and it’s usually chosen last, under budget pressure, in about twenty minutes.
This guide fixes that. Instead of another gallery of pretty kitchens, you’ll get ten specific countertop decisions—one per real kitchen—broken down into exactly what to look for, how professionals actually choose between finishes, and what to avoid when you’re the one signing off on the template before it’s cut. By the end, you’ll know how to match a material to your cooking habits, your cabinet color, and your maintenance tolerance, not just to what looked good in a showroom.
This guide is for anyone mid-renovation, mid-research, or simply tired of guessing between granite, quartz, and marble. Quick answer: choose your countertop material based on how you actually cook and clean, not on which slab photographs best—then let color and edge profile follow from that decision, not lead it. Let’s start with the first kitchen.
Results will always shift a little based on your own layout, budget, and taste—for anything structural or expensive, like a full slab replacement, loop in a countertop fabricator or designer before you commit.
Quick Overview
| Style | Material-first kitchen design |
|---|---|
| Best For | Renovators choosing a countertop material, budget-conscious homeowners |
| Budget | Low–High (material dependent) |
| Difficulty | Medium (professional installation typical) |
| Maintenance Level | Varies by material—covered per section |
Let the Wood Do the Work a Backsplash Usually Does
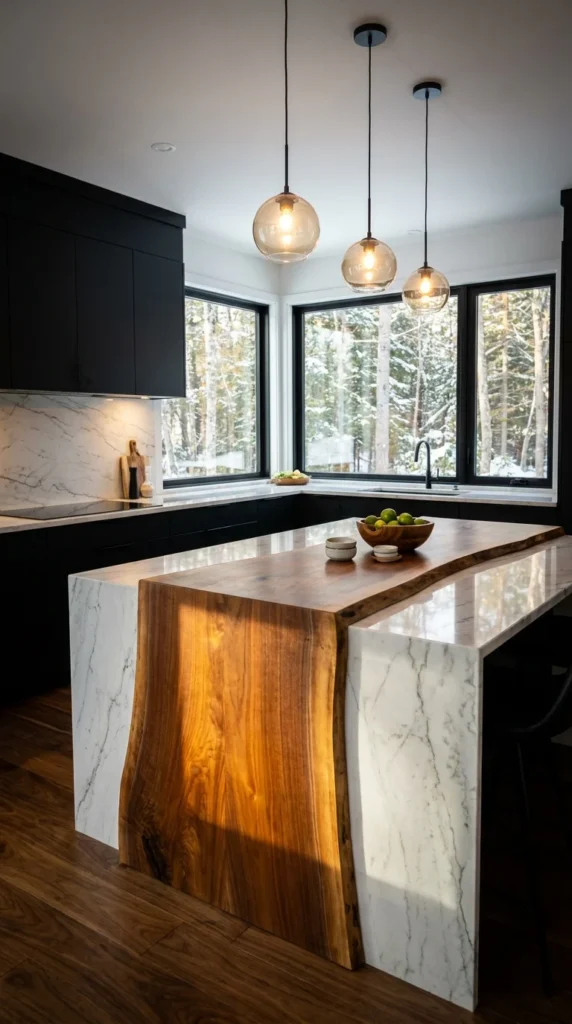
Start by picking one natural material and letting it run uninterrupted through the countertop instead of stopping it at a seam. In this kitchen, a live-edge walnut slab is set directly into a white marble waterfall island, and the wood is never treated as an accent—it’s treated as a structural material with the same visual authority as the stone around it.
This matters because most kitchens layer materials side by side—wood floor, stone counter, painted cabinet—and let each one compete for attention separately. Running the walnut straight through the marble’s waterfall edge instead removes the seam that would normally announce, “This is where one material ends.” Professionally, this is called a material bridge: a single element carried through two otherwise separate zones so the eye reads them as one composition rather than three decisions.
To execute this at home, a fabricator needs the exact live-edge slab in hand before the marble is cut—the stone gets templated around the wood’s natural, irregular contour, not the other way around. Budget tiers: 💚 Affordable—a single walnut cutting board inset into a standard laminate counter; 💛 Mid-Range—a butcher block hybrid counter with a stone-look quartz surround; 💎 Investment—a true live-edge slab bridged into a full marble waterfall, exactly as shown here.
💡 Pro Tip
Ask your fabricator for a physical sample of both materials side by side under your kitchen’s actual lighting before committing—marble reads cooler under LED and warmer under incandescent, and a mismatch only becomes obvious once the slab is already cut.
The Seam That Disappears on Purpose
One reason this island reads as a single object rather than two materials pushed together is that the walnut isn’t framed with a trim strip or reveal line—it meets the marble edge to edge. That kind of joint requires the wood to be sealed and stabilized before installation, since raw live-edge slabs move slightly with humidity, and a fixed stone edge will not move with it. Skip that step, and the seam that looked seamless on installation day opens into a visible gap within a year.
Recommended Materials
- Live-edge walnut slab
- White Calacatta-style marble
- Matte black cabinetry
- Amber glass pendant fixtures
- Wide-plank walnut flooring
Main Colors
- Warm Walnut Brown
- Marble White
- Matte Black
- Soft Amber
Best Lighting
- Three staggered amber glass pendants
- Corner window natural daylight
- 2700K warm bulbs for evening use
Maintenance
- Reseal the marble every 6–12 months depending on use
- Oil the exposed wood edge twice a year to prevent drying and cracking
- Wipe acidic spills (citrus, wine, vinegar) off marble immediately
- Keep the wood-to-stone seam dry—avoid letting water pool at the joint
Where This Look Falls Apart
- Choosing a wood slab that wasn’t kiln-dried, so it warps after installation
- Using a glossy marble finish that competes with the wood instead of framing it
- Skipping the sealant step on live-edge wood, leading to staining at the seam
- Placing the wood section directly under a sink or faucet where it will see constant water
Choose a Curved Edge When the Island Has to Double as a Table
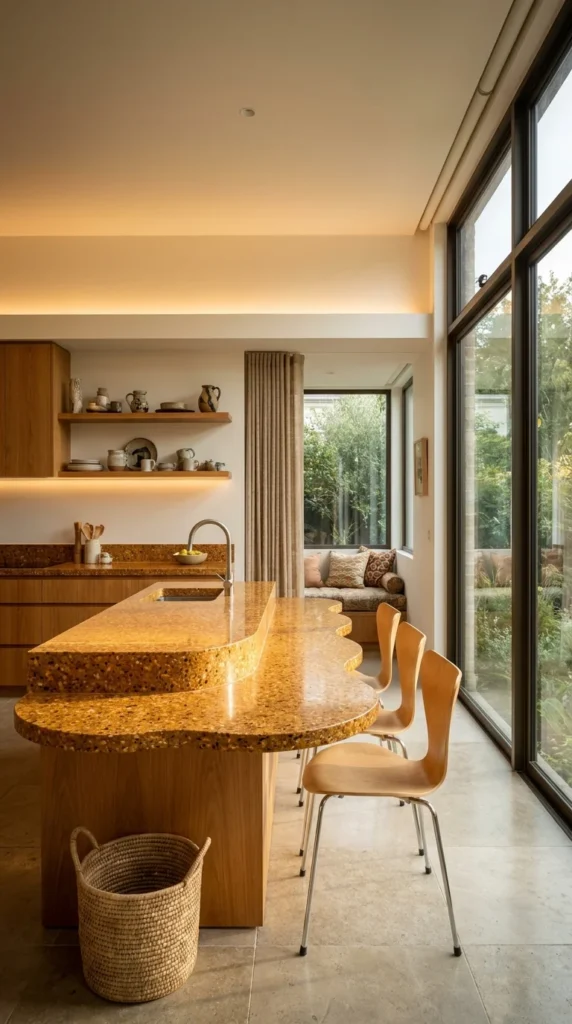
Round the corners of your island before you finalize the shape, especially if the counter also functions as seating. This amber terrazzo island skips the standard rectangular waterfall entirely in favor of a soft, scalloped profile that wraps around three dining chairs without a single hard edge in reach.
A sharp 90-degree mitered corner works fine on a counter nobody sits against, but the moment stools tuck underneath, that corner sits at hip height for anyone walking past. Curved edges solve a real ergonomic problem, not just an aesthetic one—the shape follows how people actually move through the space rather than how a slab is easiest to cut.
How to apply this at home: work with your fabricator on a template mockup (cardboard or plywood) before the stone or resin is poured, and walk the actual kitchen traffic path around it. A curve that looks graceful on paper can still clip a doorway or drawer swing in real life, so test the template in place first.
📌 Important Note
Curved countertop edges cost more to fabricate than straight ones because they require custom templating and, for natural stone, specialized cutting equipment—budget an extra 15–25% over a standard straight-edge quote for this shape.
A Material Choice That Explains the Curve
Terrazzo—a composite of stone chips set in resin or cement—is naturally suited to curved forms in a way that large-format natural stone slabs are not, since it’s poured rather than cut from a single piece. That’s part of why this specific material shows up on a shape this unconventional: the fabrication method and the design goal are working together, not fighting each other.
Recommended Materials
- Resin-based terrazzo composite
- Honey oak cabinetry
- Warm terracotta floor tile
- Woven rattan storage basket
Main Colors
- Amber Terrazzo
- Honey Oak
- Warm Cream
- Charcoal fleck accents
Best Lighting
- Floor-to-ceiling window natural light
- Recessed ceiling downlights
- Warm under-shelf LED strip lighting
Where This Look Falls Apart
- Picking a curve radius too tight for standard bar stools to tuck under comfortably
- Choosing a terrazzo chip size that reads busy against an already patterned floor
- Forgetting knee clearance when the curve wraps around a seating zone
- Mixing warm terrazzo tones with cool-toned cabinetry, which flattens the amber warmth
Let One Bold Slab Set the Entire Room’s Color Story
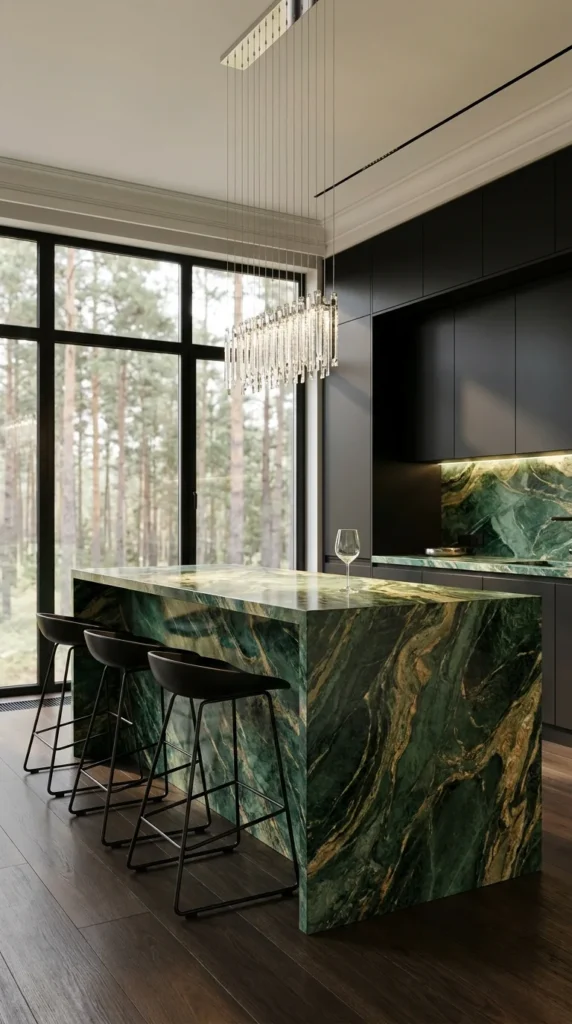
Pick your statement material before you pick your paint color, not after. In this kitchen, a deep green marble waterfall island was clearly chosen first—the matte black cabinetry, the wood flooring, and even the crystal chandelier all read as supporting choices built around what the stone was already doing.
This is the reverse of how most people plan a kitchen. Choosing cabinet color first and then hunting for a countertop that “goes with it” limits your stone options to whatever’s left over. Choosing the slab first works because natural stone has fixed veining and color—you cannot special-order a different vein pattern, but you absolutely can special-order cabinet paint to match.
To apply this practically, visit the slab yard before finalizing a single other material in the kitchen. Photograph the exact slab you’re considering under your kitchen’s actual light direction if possible, then build your palette from the dominant and secondary tones already present in the stone.
Worth the Investment?
A full-slab statement marble island like this one is genuinely worth the higher cost if it’s the room’s only bold material—the rest of the kitchen here stays deliberately quiet (matte black, warm wood, no patterned tile) specifically so the marble carries the visual weight alone. Where this stops paying off is a kitchen that already has a busy backsplash or patterned floor competing for the same attention; in that case, the investment gets diluted rather than doubled. If your existing kitchen already reads as visually loud, a calmer, more uniform stone will likely serve you better than a second statement piece.
Recommended Materials
- Verde-pattern marble slab
- Matte black cabinetry
- Engineered wood flooring
- Crystal linear chandelier
Main Colors
- Forest Green
- Gold Veining
- Matte Black
- Warm Wood Tone
Best Lighting
- Statement crystal linear chandelier
- Recessed under-cabinet lighting
- Floor-to-ceiling black-framed windows
Maintenance
- Seal the marble annually to guard against etching
- Use a pH-neutral stone cleaner, never standard kitchen degreaser
- Blot spills immediately rather than wiping, which can spread acidic liquids
- Avoid cutting directly on the surface to prevent scratching the polished finish
Where This Look Falls Apart
- Adding a second bold material (patterned tile, colorful cabinetry) that competes with the marble
- Choosing a low-contrast paint color that makes the veining disappear into the background
- Under-lighting the island so the veining and depth of the stone go unnoticed
- Selecting a honed instead of polished finish when the goal is maximum shine and drama
Carry the Countertop Up the Wall Instead of Stopping at the Edge
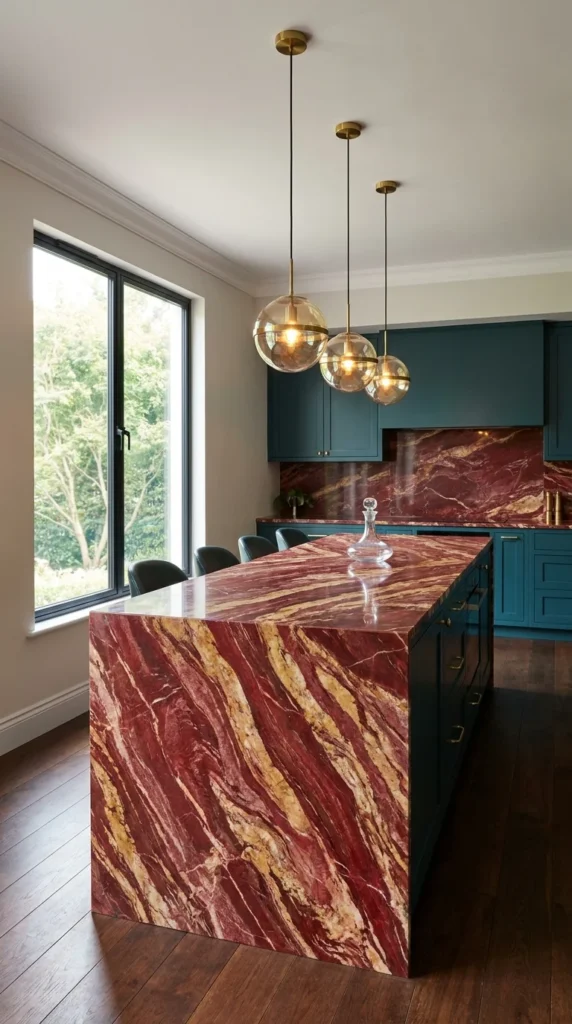
Extend your countertop material into a full-height backsplash rather than treating them as two separate purchases. This red-and-gold veined marble runs from the island straight up the wall behind the range, matching pattern for pattern instead of pairing the stone with a different tile.
The reason this reads as more expensive than a standard 4-inch backsplash isn’t just the material—it’s the pattern continuity. A slab this heavily veined loses its story if it’s cut into two disconnected pieces; matched book-end slabs (cut from the same block and installed side by side) keep the vein lines flowing as if the wall and counter were always one surface.
How to apply it: ask your fabricator specifically for “book-matched” slabs if you want this effect, and confirm during the template stage which cut edges will meet at the wall-to-counter transition. This decision has to be made before the stone is cut—it cannot be corrected afterward.
Recommended Materials
- Rosso-pattern marble slab (book-matched)
- Painted teal shaker cabinetry
- Brass hardware and fixtures
- Engineered wood flooring
Main Colors
- Deep Red / Maroon
- Golden Veining
- Teal
- Brass
Best Lighting
- Three amber glass globe pendants
- Brass-finished fixtures
- Large window for daylight balance
Maintenance
- Reseal both the counter and backsplash together on the same schedule
- Wipe down the backsplash after cooking to prevent grease etching into the stone
- Avoid abrasive scrubbers near the range, where residue builds up fastest
- Check the counter-to-wall seam annually for any separation
Where This Look Falls Apart
- Ordering slabs that aren’t sequentially cut from the same block, breaking the vein match
- Choosing a busy stone pattern for a small kitchen, where it can feel overwhelming
- Pairing bold, warm marble with cool-toned cabinetry that fights its undertones
- Installing the backsplash slab with visible seams instead of a continuous panel
Home cooks weighing a full stone backsplash against tile often look at 10 Scandinavian Kitchens That Show What Minimalism Really Looks Like for the opposite approach—quiet surfaces instead of a statement slab.
Use a Neutral Countertop to Let Bold Cabinetry Win
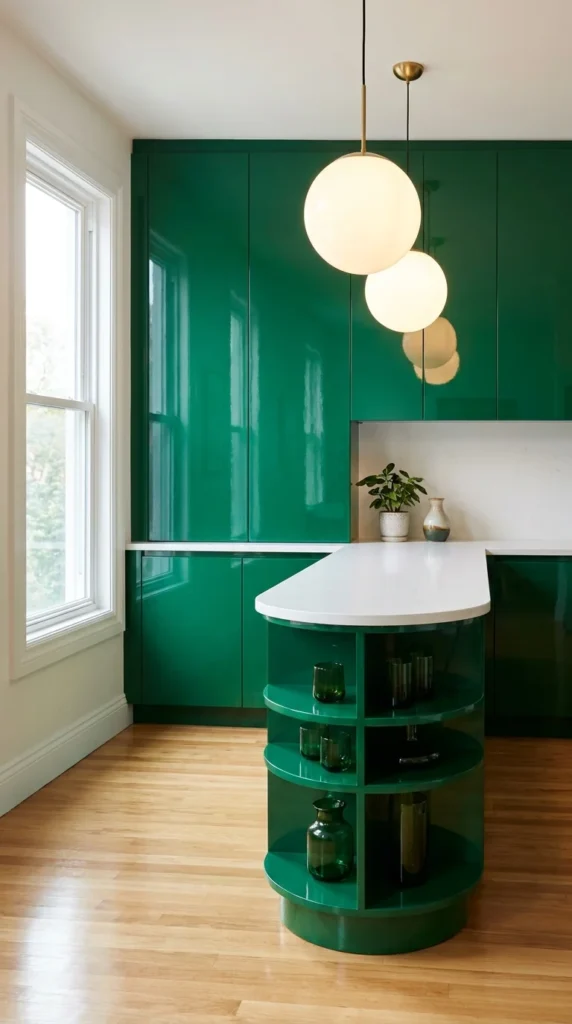
When your cabinetry is already the loudest element in the room, keep the countertop quiet on purpose. This small, curved island pairs a plain white quartz surface with high-gloss emerald cabinetry—and the restraint on the counter is what keeps the whole kitchen from feeling like two competing statements.
This is a deliberate hierarchy decision. A room only has room for one dominant material before it starts to feel unresolved; here, the lacquered green cabinetry has already claimed that role, so the countertop’s job shifts to support, not compete. A patterned or heavily veined stone on top of glossy green cabinetry would fight for the same visual attention and cancel out the impact of both.
To apply this at home, identify which single element in your kitchen you want to be the star before finalizing materials—then deliberately simplify everything else around it. If cabinetry is your splurge, let the counter, floor, and backsplash stay calm.
Recommended Materials
- High-gloss lacquer cabinetry
- White quartz countertop
- Brass-stemmed glass pendant fixtures
- Warm wood flooring
Main Colors
- Emerald Green
- White Quartz
- Brass
Best Lighting
- Layered globe pendant fixtures
- Under-cabinet task lighting
- Natural light from the adjacent window
Where This Look Falls Apart
- Choosing a veined or patterned countertop that competes with glossy, saturated cabinetry
- Using a matte counter finish against high-gloss cabinets, which reads as mismatched rather than intentional
- Skipping open shelving in the curved base, wasting usable storage the shape allows for
- Picking warm-white quartz against a cool-toned green, creating an undertone clash
Pick a Curved Waterfall Edge When the Stone Itself Is the Feature
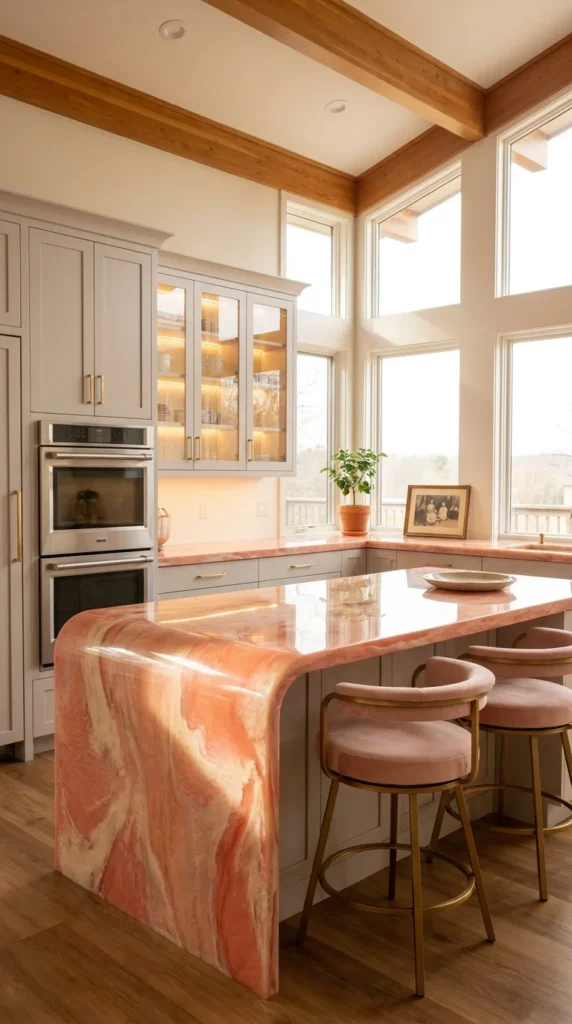
Round the mitered corner of a waterfall countertop when the stone’s veining is dramatic enough to deserve an uninterrupted flow. This coral-toned onyx-style slab wraps continuously around the island’s corner instead of meeting at a sharp seam, letting the pattern move around the shape rather than break at it.
A standard 90-degree waterfall miter creates a visible joint line at the corner, which is fine for a subtle stone but works against a heavily patterned one—the eye catches the interruption exactly where the veining should be flowing. A curved corner removes that break point entirely, so the pattern reads as one continuous gesture from countertop to floor.
How to apply this: this only works with a fabricator experienced in curved stone cutting, since a rounded waterfall edge requires far more precise templating than a straight miter. Expect a longer lead time and get a written confirmation of vein direction before the cut is finalized.
⚠️ Warning
A curved waterfall edge on real stone (as opposed to engineered quartz) is more prone to chipping at the rounded corner than a straight miter, since the curve creates thinner cross-sections in places. Ask your fabricator about edge reinforcement if this island will see daily bumps from stools or foot traffic.
Recommended Materials
- Rosa-pattern onyx or marble slab
- Warm gray shaker cabinetry
- Brass hardware
- Glass-front upper cabinetry
Main Colors
- Coral Pink
- Cream
- Warm Gray
- Brass
Best Lighting
- Tall window natural daylight
- Under-cabinet lighting
- Interior-lit glass cabinet fronts
Maintenance
- Seal immediately after installation and re-seal every 6 months for high-traffic use
- Avoid placing hot cookware directly on the surface without a trivet
- Clean with a soft cloth only—avoid anything abrasive on the polished curve
- Watch the curved edge closely for early chip signs and address them before they spread
Where This Look Falls Apart
- Choosing a curved edge on a busy pattern that actually needs a hard line to look intentional
- Skipping edge reinforcement on a high-traffic island corner
- Using a cool-toned gray that mutes the warmth of a coral or pink stone
- Mismatching glass cabinet lighting temperature with the room’s main fixtures
Match Your Countertop Behind the Range, Not Just the Sink
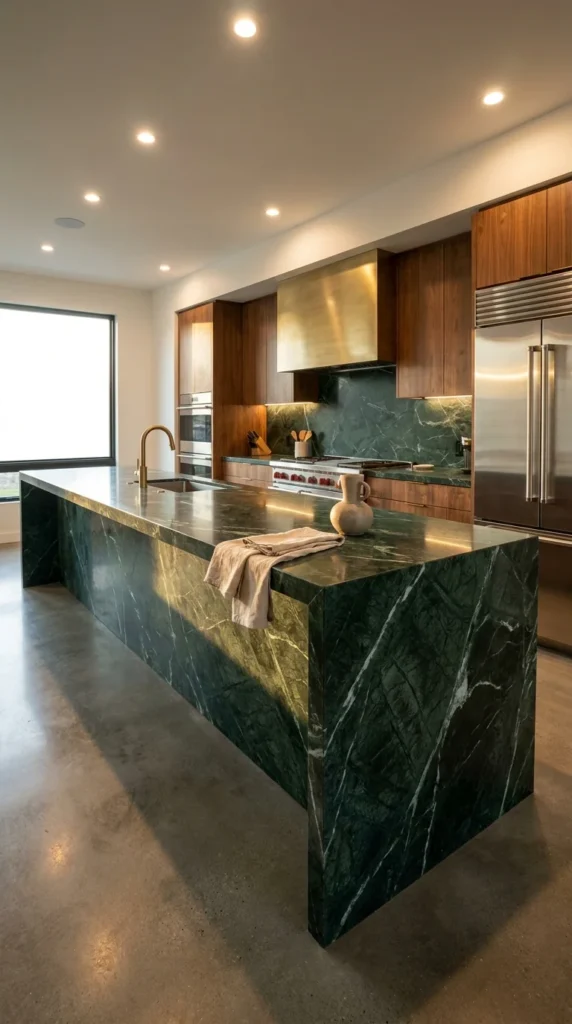
Extend a heat-tolerant stone as a full backsplash directly behind the cooktop, where grease and splatter actually happen—not just around the sink, where most kitchens default to tile. This dark green stone runs the full length of the range wall, giving the busiest zone in the kitchen a surface built to take the abuse.
This is a functional decision disguised as an aesthetic one. Tile grout behind a range absorbs grease over time and becomes difficult to fully clean; a continuous stone slab has no grout lines to stain in the first place. Soapstone in particular is often chosen for this exact reason—it’s naturally heat-resistant and doesn’t react to acidic splatter the way marble can.
To apply this, prioritize the range wall first when deciding where your countertop budget goes toward a full-height slab backsplash, even if that means a simpler treatment elsewhere in the kitchen. The area you cook in front of daily benefits the most from an upgrade the rest of the room might not need.
Recommended Materials
- Soapstone or dark green marble
- Walnut veneer cabinetry
- Brushed brass range hood
- Polished concrete flooring
Main Colors
- Deep Forest Green
- Warm Walnut
- Brushed Brass
- Cream
Best Lighting
- Recessed ceiling downlights
- Under-cabinet task lighting
- Large end-of-island window
Maintenance
- Oil soapstone monthly to maintain its deep, even patina
- Wipe the range-wall section daily to prevent grease buildup between sealings
- Avoid harsh chemical cleaners, which strip natural stone finishes over time
- Check the hood-to-backsplash seam annually for heat-related separation
Where This Look Falls Apart
- Choosing marble instead of soapstone or granite directly behind an active range, where heat and acid both hit hardest
- Stopping the stone short of the full range width, leaving a tile gap that stains differently
- Skipping a proper ventilation hood, which shortens how long any backsplash finish stays clean
- Pairing a dark backsplash with dark upper cabinets, losing definition in a windowless corner
Kitchens built around a similarly dramatic material story are worth a look in Maximalist, Funky Kitchens to Steal for Your Next Renovation, where bold surfaces get pushed even further.
Choose a Slab Where the Veining Was Cut to Continue, Not Just Match
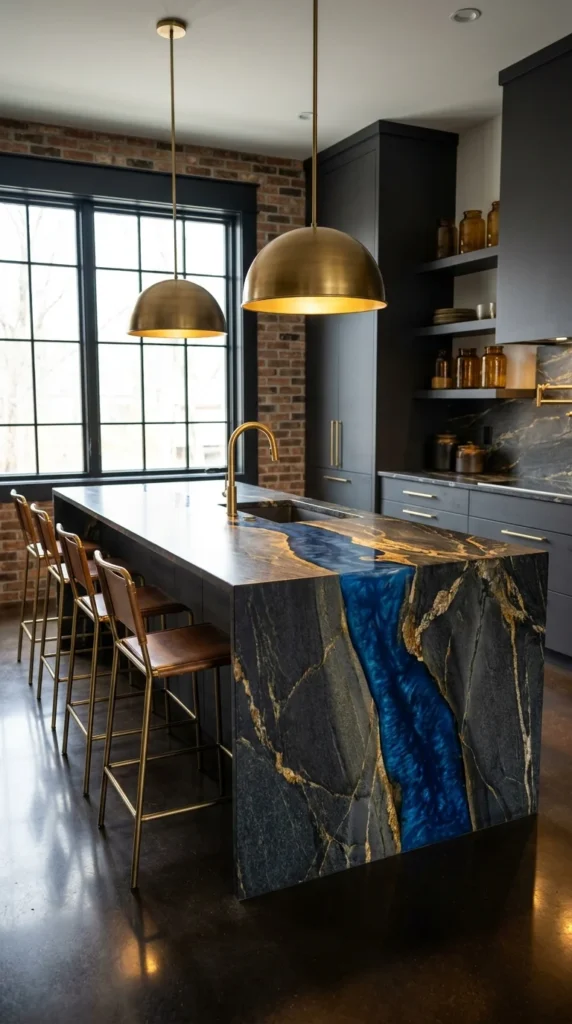
When buying a statement slab, ask specifically how the veining will align across the waterfall edge before the stone is cut—not just whether the colors match. In this island, a bold blue-and-gold vein runs from the countertop straight down the mitered corner without breaking, which only happens when the fabricator plans the cut around that exact vein in advance.
Most waterfall edges are cut for structural efficiency first, pattern second—the fabricator finds the most economical way to get three panels out of one or two slabs, and vein continuity is a bonus if it happens to align. Requesting true vein-matching flips that priority, which is why it costs more and takes longer to fabricate. The visual payoff is a corner that reads as one uninterrupted piece of stone rather than three panels glued together.
To apply this, bring a photo or sketch of exactly which vein you want continuing around the corner when you meet with your fabricator, and confirm the cutting plan in writing before the slab is touched. This is not something that can be adjusted after the fact.
Worth the Investment?
A vein-matched statement slab like this one earns its premium price specifically at the corner—that’s the one spot in the kitchen where a break in the pattern would be most visible, every single day, at eye level for anyone standing at the island. Where it stops being worth the extra cost is on a smaller peninsula or a counter without a prominent waterfall corner, since there’s no dramatic transition point left for the vein-matching to actually showcase. If your layout is a simple straight run, put that budget toward the slab’s overall quality instead.
Recommended Materials
- Statement granite or quartzite slab (vein-matched)
- Matte black cabinetry
- Brushed brass fixtures
- Polished concrete flooring
- Exposed brick wall
Main Colors
- Charcoal Black
- Electric Blue Veining
- Gold Veining
- Warm Brass
Best Lighting
- Brass dome pendant lighting
- Under-cabinet task lighting
- Large black-framed window
Maintenance
- Seal immediately and reseal every 6–12 months depending on porosity
- Avoid placing anything acidic directly on the surface without a coaster or trivet
- Dust and wipe regularly to keep the polished finish reflective
- Inspect the waterfall corner seam yearly, since it sees the most physical contact
Where This Look Falls Apart
- Accepting whatever vein alignment the fabricator defaults to instead of specifying it upfront
- Choosing a busy stone for a small kitchen where the drama has no room to read properly
- Pairing a cool-toned blue vein with warm-toned wood elsewhere, creating a temperature clash
- Under-lighting the waterfall corner so the vein match goes unnoticed
Match Your Countertop to the Floor When You Want the Room to Feel Larger
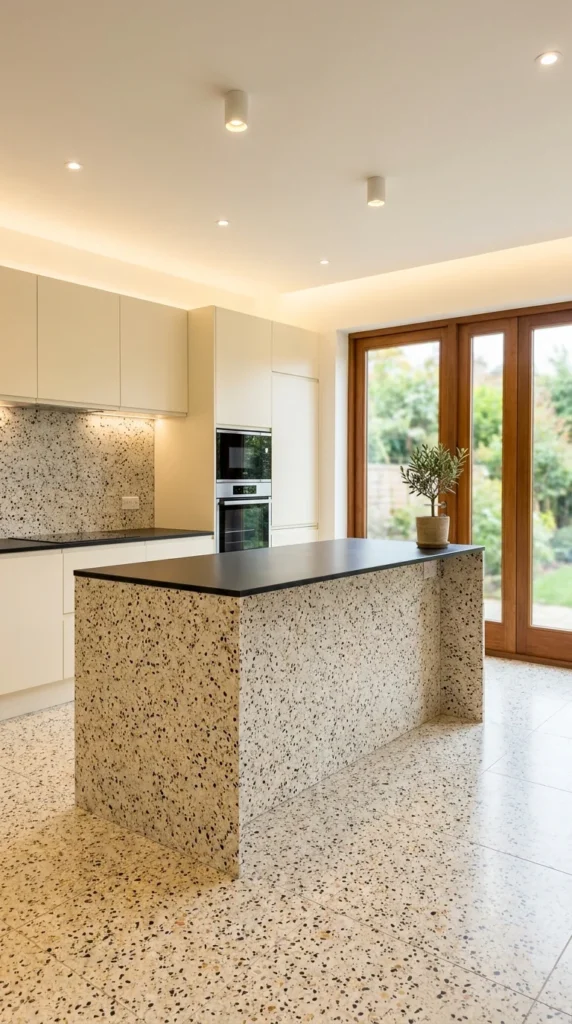
Choose a countertop material that echoes your flooring when the goal is to make a kitchen feel more open than its actual square footage. This cream terrazzo island sits directly on a matching terrazzo floor, and the visual effect is that the island appears to rise out of the ground rather than sit as a separate object placed on top of it.
This works because of how the eye tracks continuity versus contrast. A dark countertop on a light floor creates a hard visual stop at the base of the island, which subtly shrinks the room by breaking it into distinct zones. Matching the two materials removes that visual boundary, letting the floor plane and the counter plane read as one continuous surface—a trick often used in genuinely small kitchens to borrow perceived space.
To apply this at home, request floor and countertop samples from the same material family (not just similar-looking, but from the same supplier batch) before ordering either—dye lots and chip sizes can vary enough between suppliers to break the illusion.
Recommended Materials
- Cream terrazzo composite (floor and counter matched)
- Cream lacquer cabinetry
- Black quartz edge cap
- Wood-framed French doors
Main Colors
- Cream Terrazzo
- Charcoal Flecks
- Black Trim
- Warm Oak
Best Lighting
- Recessed ceiling downlights
- Natural light from French doors
- Under-cabinet strip lighting
Where This Look Falls Apart
- Ordering floor and counter terrazzo from different batches, creating a visible tone mismatch
- Skipping a contrasting edge detail, which can make the island’s silhouette disappear entirely
- Choosing a chip size for the counter that is too different in scale from the floor’s pattern
- Placing heavily patterned rugs nearby that interrupt the intended continuity
Split One Countertop Into Two Finishes for Two Different Jobs
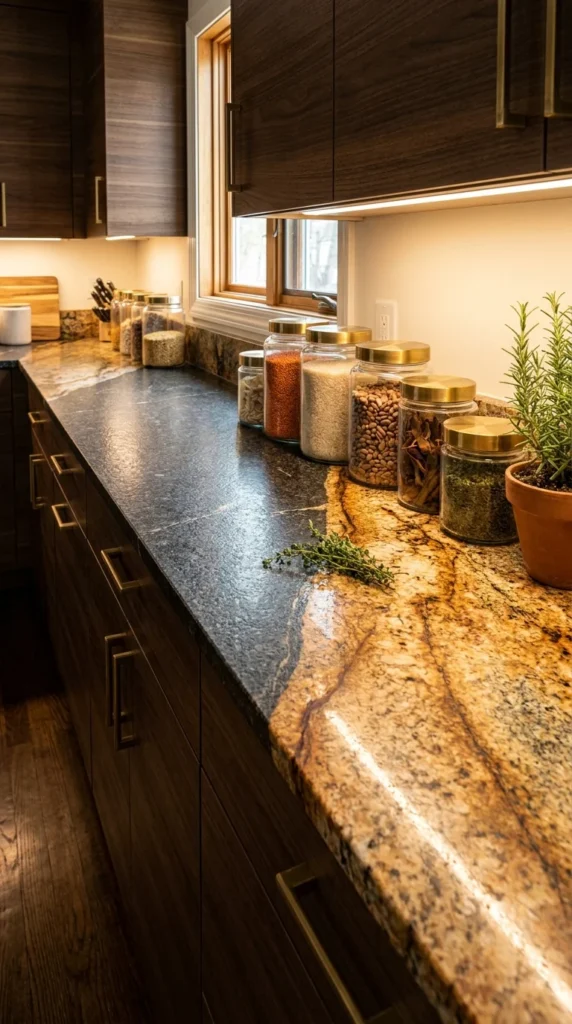
Use two different stone finishes on the same countertop run when your kitchen genuinely needs two different work zones. Here, a gold-flecked polished granite section sits beside a honed black stone section on the same counter—one built to show off, the other built to take a beating from daily prep work.
This is a practical zoning strategy, not a decorative one. A single continuous slab treats an entire counter identically, which means your most-used prep zone (chopping, rolling dough, wiping down constantly) gets the same delicate polished finish as your least-used display zone. Splitting the finish lets the honed section hide scratches and etching that would show immediately on a glossy surface, while the polished section stays reserved for lighter use.
To apply this at home, map your actual daily counter use before ordering stone—mark where you chop, where you set hot pans, and where spice jars and appliances live—and assign the more forgiving, honed finish to the heaviest-use zone specifically.
Recommended Materials
- Multicolor granite (polished)
- Honed black granite or soapstone
- Dark walnut cabinetry
- Brass-lidded storage jars
Main Colors
- Black
- Gold
- Warm Amber
- Charcoal
Best Lighting
- Under-cabinet LED strip lighting
- Warm window-adjacent daylight
- Brass accents reflecting ambient light
Maintenance
- Reseal the polished section on a stricter schedule than the honed section, since polished stone shows etching faster
- Wipe the honed zone after every use, since matte finishes trap oil more visibly over time
- Use separate cleaning products if the two stones have different porosity levels
- Inspect the seam between the two finishes annually for any lifting or discoloration
Where This Look Falls Apart
- Splitting the counter without a clear functional reason, which can read as accidental rather than intentional
- Choosing two stones with clashing undertones instead of a shared color family
- Placing the polished section where the most cutting and prep actually happens
- Leaving a visible seam gap between the two materials instead of a tight, finished transition
For kitchens where storage logic drives the layout the same way workflow drives this counter, what makes a pantry? Actually Functional? 10 Examples applies the same zoning thinking to cabinets instead of stone.
Countertop Cooking Workflow Tips
- Position your most heat- and stain-resistant material (granite, soapstone, or quartz) directly around the range and sink, saving delicate marble for lower-use zones
- Keep a dedicated cutting board on hand at all times if your counter is natural stone—even “durable” stone can scratch under a direct blade
- Store trivets within arm’s reach of the stove so hot cookware never lands straight on the counter out of habit
- Wipe acidic spills (citrus, tomato, wine, vinegar) within minutes on any polished natural stone, since etching happens faster than most people expect
Who Should Choose This Style?
- Best for homeowners planning a full kitchen renovation who want the countertop to drive the rest of the palette
- Best for anyone who cooks daily and needs the material choice to hold up to real use, not just photograph well
- Best for renovators comfortable working closely with a stone fabricator on templating and slab selection
- Not ideal for renters or anyone on a tight timeline, since natural stone fabrication and installation typically take several weeks
- Not ideal for households wanting zero maintenance, since most of the materials shown here need periodic sealing or oiling
Budget Summary
| Budget | Expectation |
|---|---|
| Low | Laminate or basic quartz counter, standard tile backsplash, straight-edge profile |
| Medium | Mid-tier engineered quartz or granite, partial stone backsplash, simple waterfall edge |
| Premium | Book-matched or vein-matched natural stone, full-height slab backsplash, custom curved or live-edge details |
Frequently Asked Questions
What’s the most durable countertop material for daily cooking? Granite and quartz are generally the most forgiving for heavy daily use—both resist scratching and heat better than marble or onyx, which are softer and more porous.
Do I need to seal my countertop, and how often? Any natural stone (marble, granite, soapstone, or onyx) needs periodic sealing to resist staining, typically every 6–12 months depending on porosity and how heavily the surface is used. Engineered quartz doesn’t require sealing at all.
Can I mix two different countertop materials in one kitchen? Yes—as shown in the two-tone granite example above, splitting finishes or materials by work zone is a common professional strategy, as long as the two choices share a coherent color family.
Is a waterfall edge worth the extra cost? It depends on the slab. A dramatic, well-veined stone benefits the most from a waterfall edge, since it lets the pattern flow uninterrupted down the side. A subtler stone may not justify the added material and labor cost.
How do I choose a countertop color that won’t feel dated in a few years? Lean toward natural stone tones with organic veining (warm whites, soft greens, and honed grays) over trend-driven synthetic patterns—the kitchens in this guide that lean on real stone’s natural variation tend to hold up better over time than uniform, manufactured looks.
Your Countertop Blueprint
By now you have a working framework: pick your statement material first, match it to how you actually cook, and let color and cabinetry follow from that decision instead of leading it.
Quick recap: the strongest kitchens in this guide all made one material decision early and let everything else—cabinet color, backsplash, even lighting—support it. Whether that meant a live-edge wood inlay, a vein-matched waterfall corner, or splitting one counter into two functional finishes, the countertop wasn’t an afterthought in any of them.
Your Reader Checklist
- ☐ Decide your statement material before choosing cabinet paint or backsplash tile
- ☐ Map your actual daily counter use before assigning finishes to different zones
- ☐ Confirm vein direction and slab matching with your fabricator in writing before cutting
- ☐ Budget extra time and cost for curved edges or book-matched slabs
- ☐ Set a realistic sealing and maintenance schedule for whichever material you choose
Next step: start at the slab yard, not the paint aisle—bring home a physical sample of your top two stone choices and live with them under your own kitchen lighting for a few days before deciding.
Related Guides
- Dark Academia Kitchen Layouts for Old Homes and New Builds—for a moodier take on statement stone and dark cabinetry
- 10 Ways to Upgrade Your Bathroom With the Right Vanity—the same stone-selection logic applied to a smaller surface
- Maximalist, Funky Kitchens to Steal for Your Next Renovation—for kitchens that push bold material choices even further
- 10 Scandinavian Kitchens That Show What Minimalism Really Looks Like—the quiet, low-contrast alternative to a statement slab
- What Makes a Pantry Actually Functional? 10 Examples—zoning logic applied to storage instead of stone
About the Author: Our editorial team writes about approachable, real-budget home design for Aesthetic Lifes, with a focus on decisions homeowners can actually execute—not just admire.
Explore More
You may also enjoy:
2 Responses